27 Jan 2017
|
git
git branch명령은 branch 생성및 제거, 확인등의 기능을 하는 명령어로 주요 명령어만 요약하였습니다.
자세한 내용은 git-scm Git-브랜치-브랜치-관리에서 확인하세요.
git branch [-l]
로컬 branch 정보를 보여줍니다. (-l 옵션은 생략가능)
$ git branch
* master
  work1
git branch -v
로컬 branch의 정보를 마지막 커밋 내역과 함께 보여줍니다.
$ git branch -v
* master   4bbc62f commit message 'm1'
  work1    fe7f049 commit message 'w1'
  work_new 4bbc62f commit message 'work_new1'
git branch -r
리모트 저장소의 branch 정보를 보여줍니다.
$ git branch -r
  origin/master
  origin/work1
git branch -a
로컬/리모트 저장소의 모든 branch 정보를 보여줍니다.
$ git branch -a
* master
  work1
  remotes/origin/master
  remotes/origin/work1
git branch (이름)
로컬에 새로운 branch를 생성합니다.
$ git branch work_new
$ git branch -a
* master
  work1
  work_new
  remotes/origin/master
  remotes/origin/work1
※ 생성과 동시에 해당 branch로 이동하려면 아래 명령어를 사용합니다.
※ 원격에 있는 branch를 가져오려면 아래 명령어를 사용합니다.
[특정이름 지정시]
$ git checkout -b work2 origin/work2
[원격 branch 이름을 그대로 사용할 경우]
$ git checkout -t origin/work2
git branch (–merged | –no-merged)
--merged는 이미 merge된 branch를 표시해주고 --no-merged는 아직 merge가 되지 않은 branch만 표시합니다.
--merged에 branch 목록 이미 merge되었기 때문에 *가 표시되지 않은 branch는 삭제 가능합니다.
$ git branch --merged
* master
  work_new
  work_old

$ git branch --no-merged
  work1
  work2
git branch -d (branch 이름)
branch를 삭제합니다. 아직 merge하지 않은 커밋을 담고 있는 경우 삭제되지 않습니다.(강제종료 옵션 -D으로만 삭제 가능)
$ git branch -d work3
error: The branch 'work3' is not fully merged.
If you are sure you want to delete it, run 'git branch -D work3'.

$ git branch -d work_new
Deleted branch work_new (was 4bbc62f).
git branch -m (변경할 branch이름) (변경될 branch이름)
A 브랜치를 B 브랜치로 변경합니다.
$ git branch -v
* master   4bbc62f m1
  work2    c728ddc w2
  work_old 4bbc62f m1

$ git branch -m work2 work3

$ git branch -v
* master   4bbc62f m1
  work3    c728ddc w2
  work_old 4bbc62f m1
※ -M 옵션을 사용할 경우 기존에 동일한 이름의 branch가 있더라도 덮어씁니다.
26 Jan 2017
|
git
git remote명령은 프로젝트의 리모트 저장소를 관리하는 명령어로 주요 명령어만 요약하였습니다.
자세한 내용은 git-scm Git-브랜치-리모트-브랜치에서 확인하세요.
git remote
등록된 리모트 저장소 이름만 보여줍니다.
git remote -v
등록된 저장소 이름과 URL을 표시합니다.
$ git remote -v
origin  D:/dropbox/Dropbox/jekyll/git-work/user1/../../git-source/test.git (fetch)
origin  D:/dropbox/Dropbox/jekyll/git-work/user1/../../git-source/test.git (push)
git remote add (리모트이름) (경로)
새 리모트를 추가합니다. (경로)영역에는 URL이나 파일경로를 넣을수 있습니다.
$ git remote add jistol https://github.com/jisto.github.io
$ git remote add origin D:/dropbox/Dropbox/jekyll/git-source/test.git
$ git remote -v
jistol  https://github.com/jisto.github.io (fetch)
jistol  https://github.com/jisto.github.io (push)
origin  D:/dropbox/Dropbox/jekyll/git-source/test.git (fetch)
origin  D:/dropbox/Dropbox/jekyll/git-source/test.git (push)
git remote show (리모트이름)
모든 리모트 경로의 branch와 정보를 표시합니다.
$ git remote show origin
* remote origin
  Fetch URL: D:/dropbox/Dropbox/jekyll/git-work/user1/../../git-source/test.git
  Push  URL: D:/dropbox/Dropbox/jekyll/git-work/user1/../../git-source/test.git
  HEAD branch: master
  Remote branches:
    master tracked
    work1  tracked
  Local branches configured for 'git pull':
    master merges with remote master
    work1  merges with remote work1
  Local refs configured for 'git push':
    master pushes to master (up to date)
    work1  pushes to work1  (up to date)
git remote rm (리모트이름)
리모트 경로를 제거합니다.
$ git remote -v
jistol  https://github.com/jistol/jistol.github.git (fetch)
jistol  https://github.com/jistol/jistol.github.git (push)
origin  D:/dropbox/Dropbox/jekyll/git-work/user1/../../git-source/test.git (fetch)
origin  D:/dropbox/Dropbox/jekyll/git-work/user1/../../git-source/test.git (push)

$ git remote rm jistol

$ git remote -v
origin  D:/dropbox/Dropbox/jekyll/git-work/user1/../../git-source/test.git (fetch)
origin  D:/dropbox/Dropbox/jekyll/git-work/user1/../../git-source/test.git (push)
25 Jan 2017
|
git
tools
gitkraken
Git에 대해 공부하면서 대부분 bash에서 실행했으나 전체 commit tree를 보기 위해서는 GUI툴의 도움을 받아야 했는데 처음 사용한 툴이 Atlassian의 SourceTree였습니다.
사용하다보니 무한 로딩에 짜증나고 종종 먹통이 되며 특히 reset명령을 하면 갱신이 멈춰버렸습니다.
그런 와중에 다른 무료툴을 살펴보다 발견한것이 GitKraken입니다.
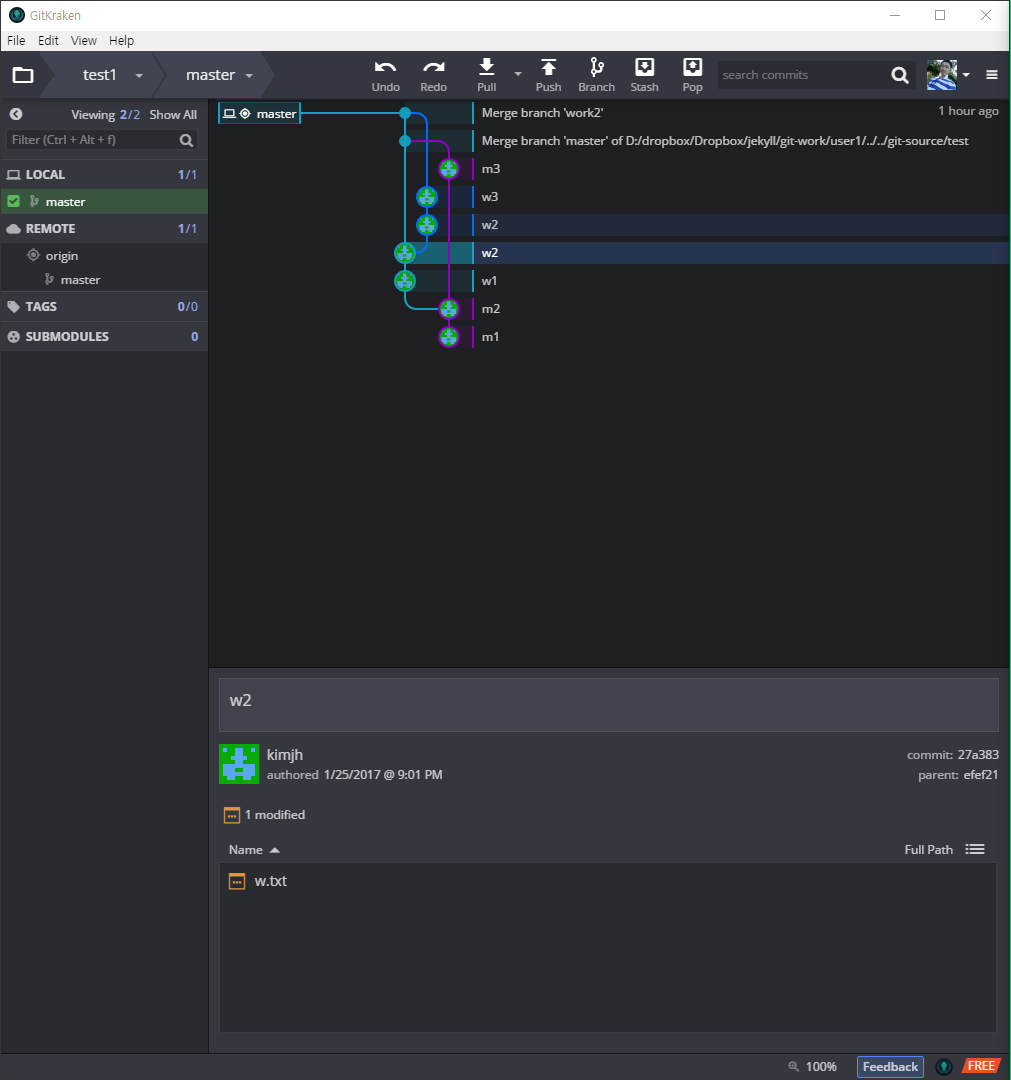
이 툴을 추천하는 이유는 아래와 같습니다.
-
갱신 속도가 빠릅니다.
SourceTree에 비해 엄청나게 이력 갱신이 빠릅니다. 로딩바도 없고 신세계!!
-
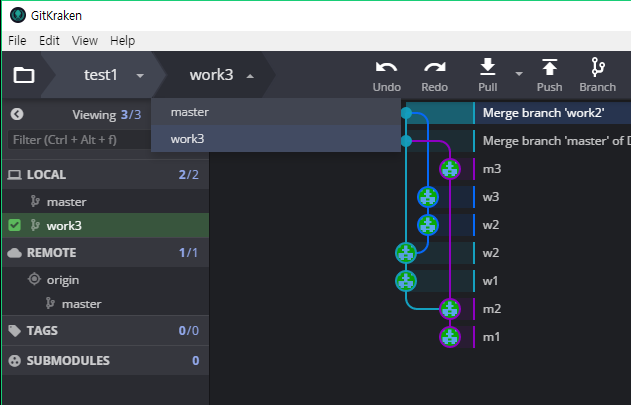
멀티 저장소/Branch 선택 기능 제공
저장소 선택 가능하고
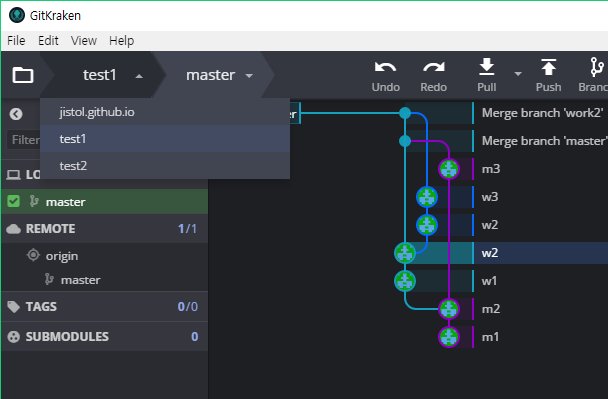
저장소별 branch도 선택 가능합니다.
-
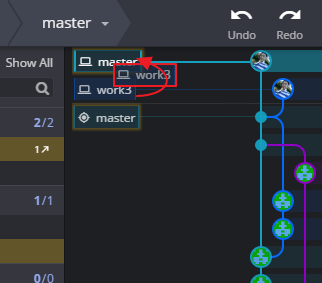
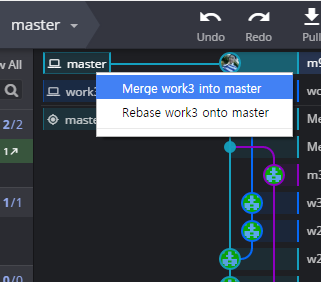
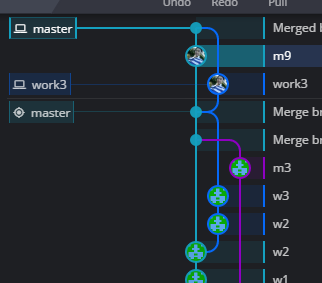
Drag and Drop을 통한 Merge & Rebase
-
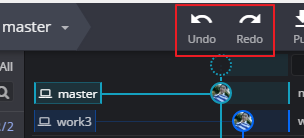
간편한 Undo / Redo 기능
-
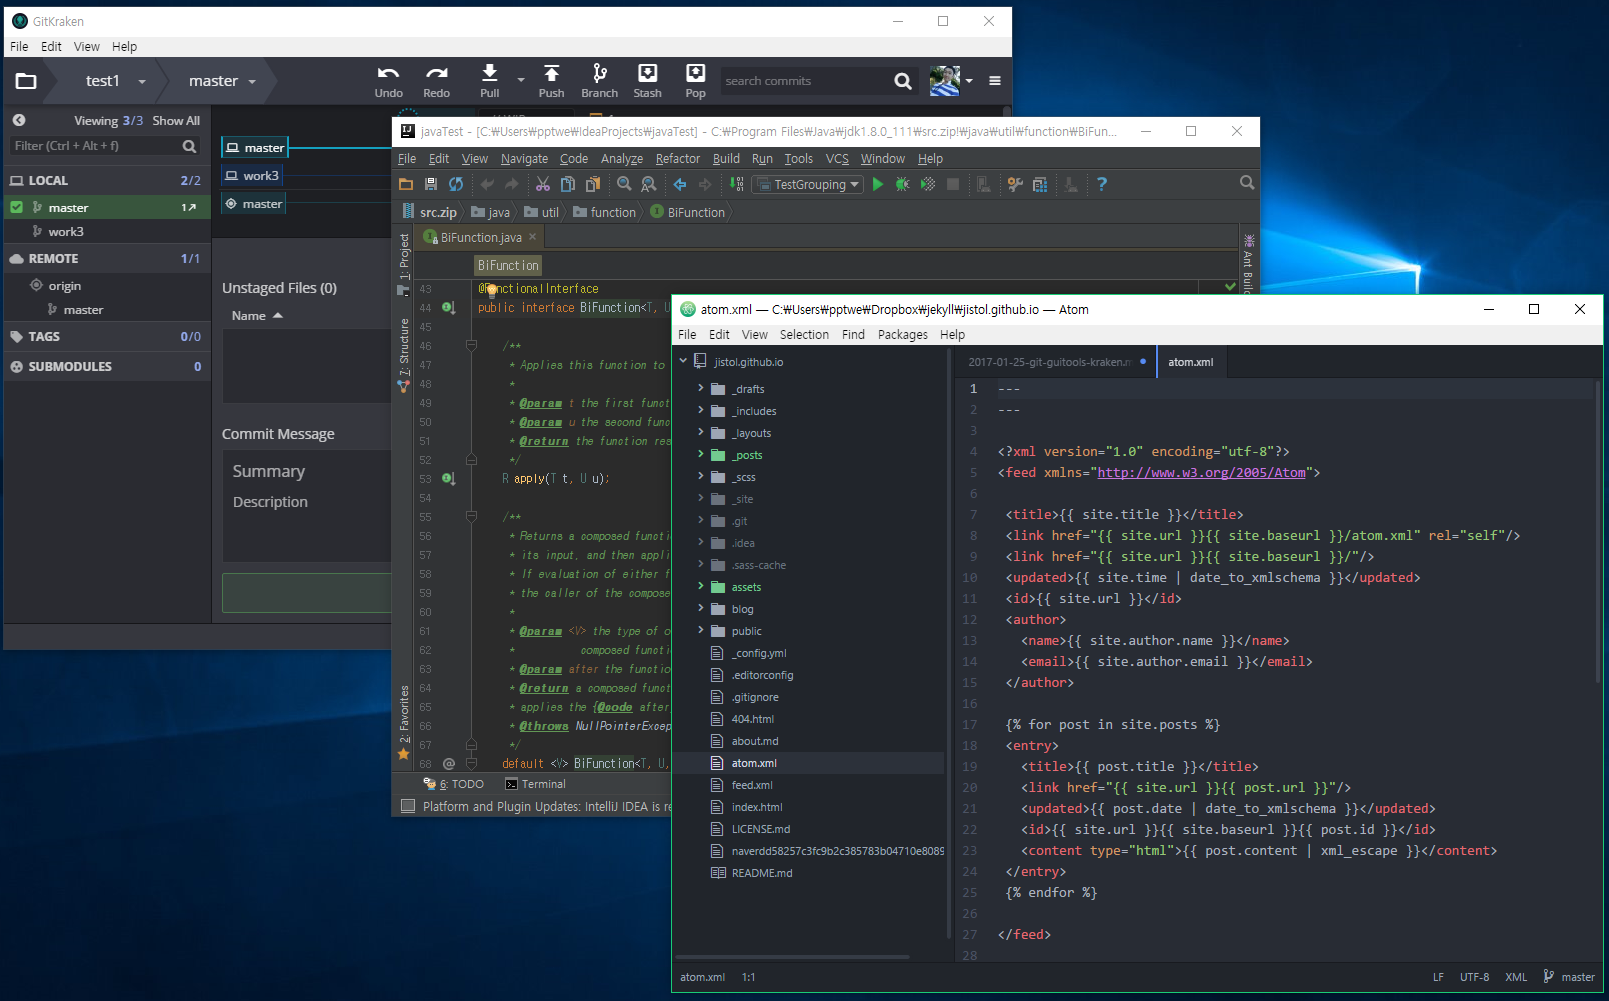
Dark계열의 디자인
IntelliJ Darcula Theme, Atom과 나란히 쓰기 좋네요~
어두운 계열 에디터 쓰기 좋아하시는 분들에게 추천합니다.
-
그 외 웬만한 기능을 다 지원(Pull, Push, Branch, 변경소스 확인 …)
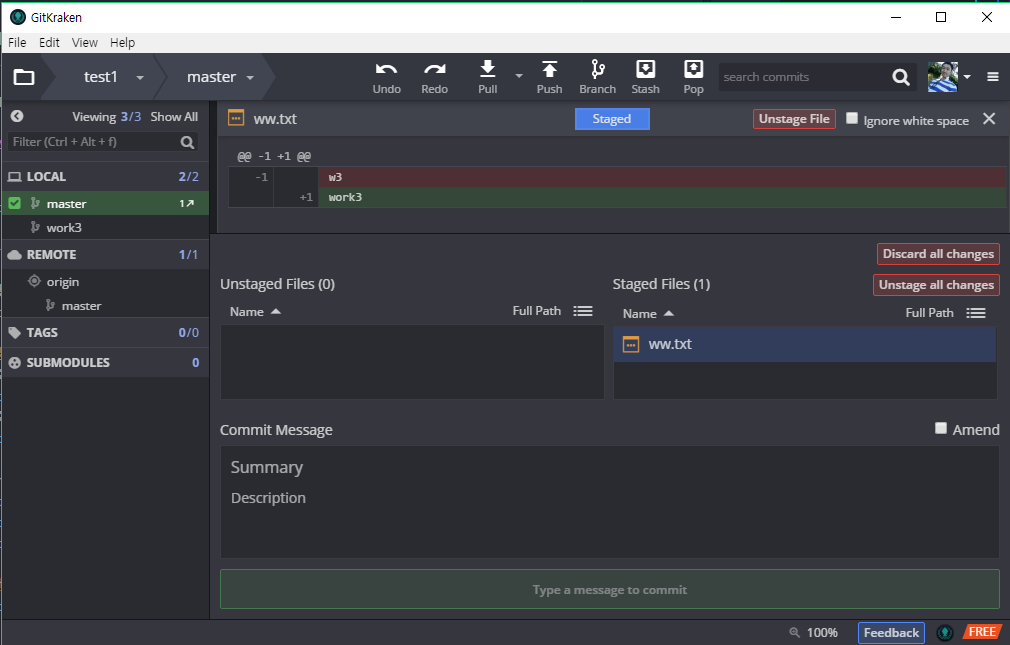
무료버전외에 돈주고 유료로도 사용 가능하지만 충분히 무료로도 쓰기 편합니다.
24 Jan 2017
|
git
Git의 branch 및 merge에 대해 공부한 내용을 예제를 통해 설명하고 요약해봅니다.(With SourceTree)
잘 설명된 원본 내용은 아래 링크를 참고하세요
Git 브랜치 - 브랜치와 Merge의 기초
Branch 생성
보통 프로그램의 별도 기능을 작성하거나, Bug,Issue 등을 따로 처리할 경우 사용하게 됩니다.
예를 들어 다음과 같이 생성된 프로젝트가 있습니다.
$ git init
$ echo 'v1' > origin.txt
$ git add .
$ git commit -m 'v1'
SourceTree를 통해 그래프를 보면 master노드에 ‘v1’ 내용을 담은 origin.txt 파일이 존재합니다.
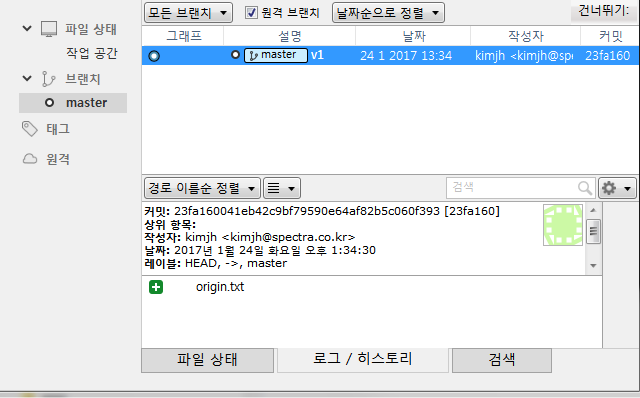
신규기능인 feature.txt 개발을 위해 branch를 생성후 파일을 만들어 commit합니다.
$ git branch feature1
$ git checkout feature1
$ echo 'f1' > feature.txt
$ git add .
$ git commit -m 'f1'
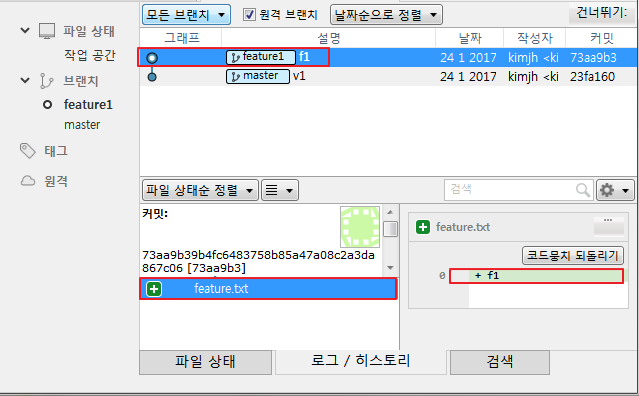
위와 같이 feature1이라는 branch가 생성되고 feature.txt가 ‘f1’내용으로 개발된 것을 볼 수 있습니다.
다시 master 노드로 돌아가 origin.txt를 ‘v2’로 변경해 봅니다.
$ git checkout master
$ echo 'v2' > origin.txt
$ git commit -a -m 'v2'
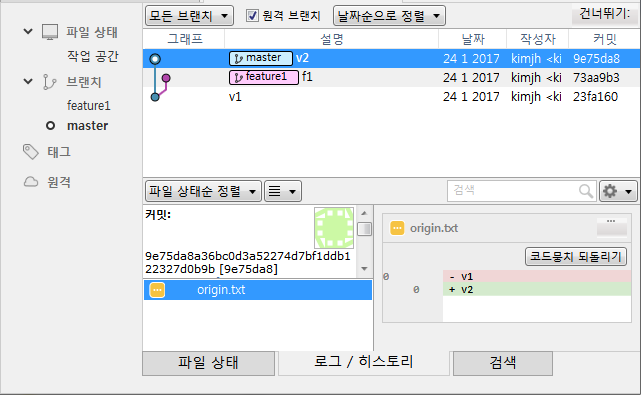
이제 좀 더 branch 가지가 분명하게 보이기 시작했습니다.
Master노드에 Merge
feature1 branch의 기능 개발이 끝났으니 master에 merge 해보도록 하겠습니다.
master에 feature1 branch 내용을 가져올 예정이니 실행은 master 노드에서 해야합니다.
$ git checkout master
$ git merge feature1 -m 'merge f1'
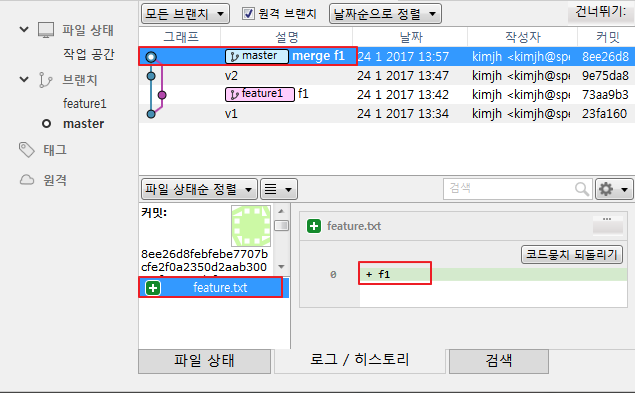
위와 같이 master노드와 feature1 branch노드가 merge되었습니다.
Reset으로 되돌리기
이번엔 노드간 충돌예제를 만들어 보기 위해 merge전으로 다시 돌아가 보겠습니다.
reset 명령을 사용합니다. reset관련 정보는 아래 링크를 참고하세요
Git 도구 - Reset 명확히 알고 가기
$ git reflog
8ee26d8 HEAD@{0}: merge feature1: Merge made by the 'recursive' strategy.
9e75da8 HEAD@{1}: commit: v2
23fa160 HEAD@{2}: checkout: moving from feature1 to master
73aa9b3 HEAD@{3}: commit: f1
23fa160 HEAD@{4}: checkout: moving from master to feature1
23fa160 HEAD@{5}: checkout: moving from feature1 to master
23fa160 HEAD@{6}: checkout: moving from master to feature1
23fa160 HEAD@{7}: commit (initial): v1
git reflog명령을 통해 히스토리를 확인할 수 있습니다. ‘v2’를 commit한 ‘HEAD@{2}’ 시점으로 돌아가 보겠습니다.
$ git reset --hard HEAD@{2}
reset의 옵션은 아래와 같습니다.
| 옵션 |
설명 |
| –soft |
Repository이력만 되돌립니다. |
| [–mixed] |
Stage영역까지만 되돌립니다. |
| –hard |
Working Directory까지 되돌립니다. |
위와 같이 hard옵션으로 되돌리고 SourceTree를 확인해보면 다시 merge전으로 돌아온 것을 확인할 수 있습니다.
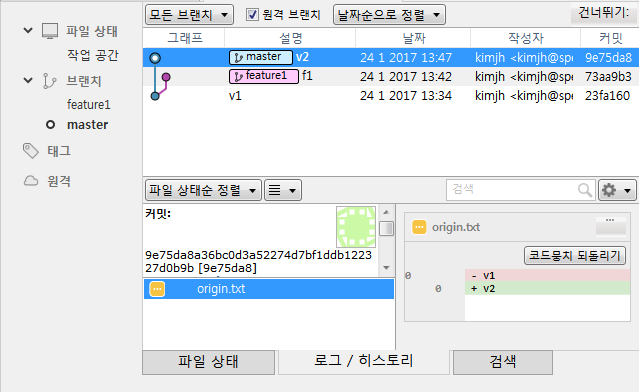
Merge 충돌 해결하기
master노드와 feature1 branch노드간의 충돌을 만들기 위해 origin.txt파일을 수정해보겠습니다.
$ git checkout feature1
$ echo 'v2-f1' > origin.txt
$ git commit -a -m 'conflict origin.txt'
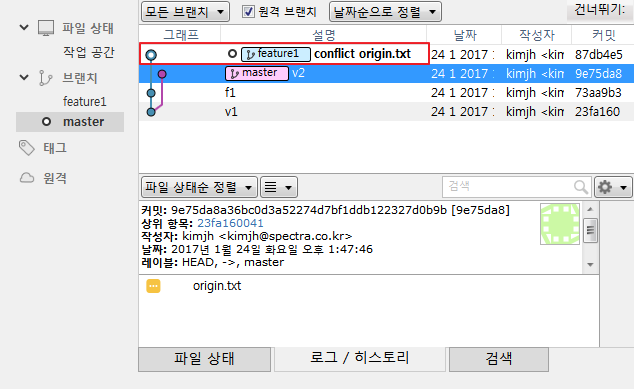
master노드와 feature1 branch노드의 origin.txt파일이 각각 달라졌습니다. 이제 merge를 합니다.
$ git checkout master
$ git merge feature1 -m 'conflict merge'
Auto-merging origin.txt
CONFLICT (content): Merge conflict in origin.txt
Automatic merge failed; fix conflicts and then commit the result.
origin.txt파일의 내용을 merging하다가 충돌이 나있는 상태입니다.
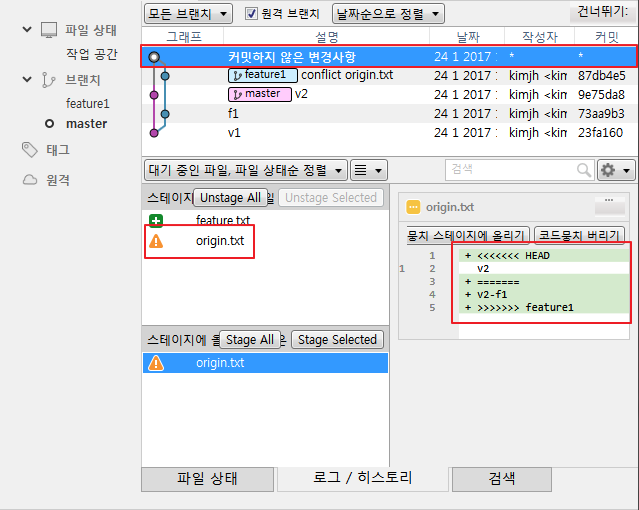
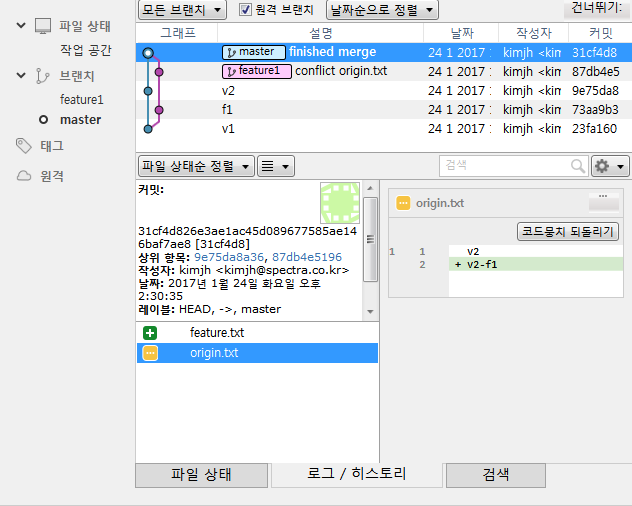
충돌난 내용은 위와 같이 구분하여 표시되고 위 내용을 알맞는 값으로 변경한 후 다시 commit하면 merge가 완료됩니다.
$ git add .
$ git commit -m 'finished merge'
23 Jan 2017
|
git
Git의 기초에 대해 정말 잘 설명되있는 페이지를 읽고 요약만 정리하고자 합니다. 원본은 아래링크를 참고하세요.
시작하기-Git-기초
SVN vs Git
SVN은 Commit 시점에 변화된 파일만 관리합니다.
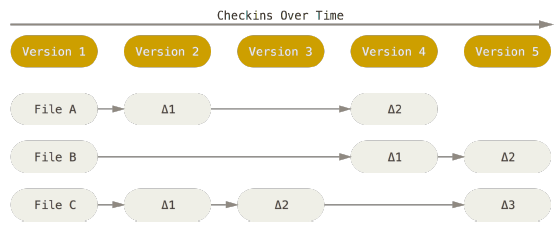
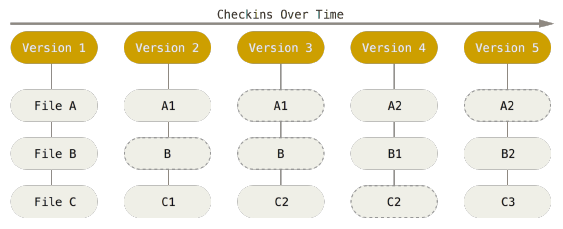
Git은 Commit 시점의 스냅샷을 관리합니다. 변화되지 않은 파일도 해당 스냅샷의 링크로 저장합니다.
Git 특징
- 거의 모든 명령을 로컬에서 실행합니다.
- 데이터를 저장전 SHA-1 해시를 구하고 그 체크섬으로 데이터를 관리합니다.(무결성)
- Commit한 데이터는 추가하기만 하고 삭제하지 않습니다.
Git의 저장구조, 상태, 상태전이
git 명령어에 따른 상태전이표입니다.
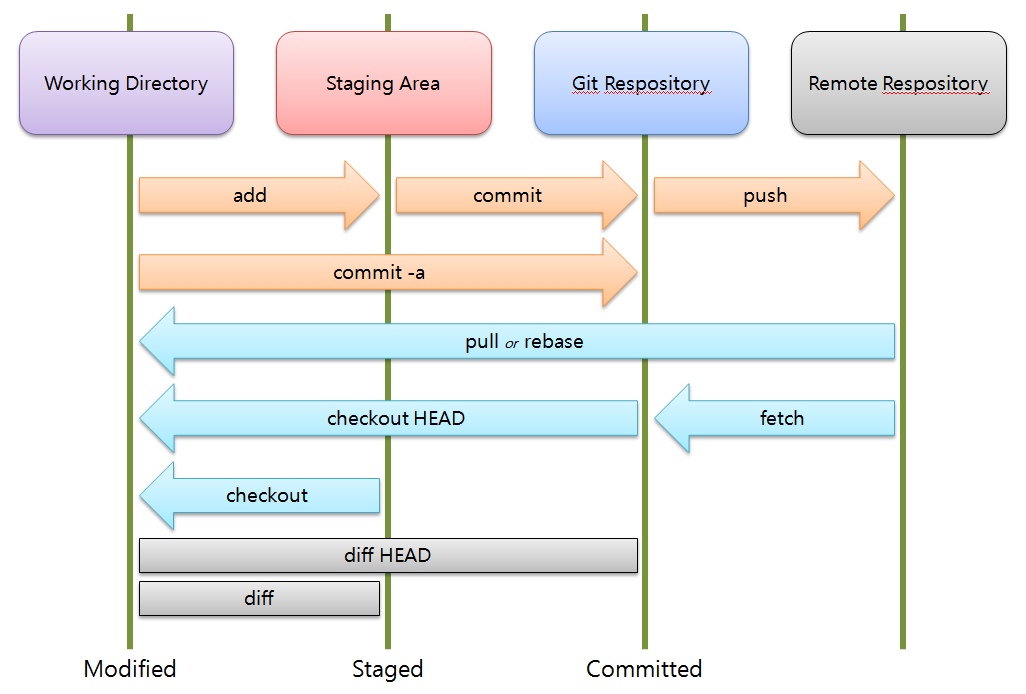
| 상태 |
설명 |
| Modified |
작업 폴더에서 수정후 Stage에 올리지 않은 상태 |
| Staged |
수정한 파일을 Stage에 올려 Commit할 스냅샷을 만든 상태 |
| Committed |
Stage의 파일을 git 저장소에 commit한 상태 |
예제
아래 명령어를 통해 두 파일을 저장소에 만들었습니다.
$ echo 'v1' > 1.txt | echo 'v1' > 2.txt
$ git add 1.txt
$ echo 'v2' > 1.txt
git status로 현재 저장소의 상태를 볼 수 있습니다.
$ git status
On branch master
Your branch is ahead of 'origin/master' by 1 commit.
  (use "git push" to publish your local commits)
Changes to be committed:
  (use "git reset HEAD <file>..." to unstage)

        new file:   1.txt

Changes not staged for commit:
  (use "git add <file>..." to update what will be committed)
  (use "git checkout -- <file>..." to discard changes in working directory)

        modified:   1.txt

Untracked files:
  (use "git add <file>..." to include in what will be committed)

        2.txt
1.txt는 새로 생성되어 ‘v1’이란 내용으로 stage에 올라가 있는 상태이고 로컬엔 ‘v2’로 수정되었습니다.
2.txt는 새로 생성되어 아직 로컬에만 있는 상태로 ‘Untracked files’로 표시됩니다.
위 상태에서 stage의 1.txt파일을 unstage하려면 git reset HEAD 1.txt로 실행가능합니다.
위 상태에서 1.txt의 내용을 다시 ‘v1’으로 돌리려면 git checkout 1.txt로 실행가능합니다.
1.txt를 commit하고 나머지 파일을 stage에 올린 후 1.txt를 다시 수정해보겠습니다.
$ git commit -m '1.txt commit'
$ git add .
$ echo 'v3' > 1.txt
다시 상태를 보면 아래와 같습니다.
$ git status
On branch master
Your branch is ahead of 'origin/master' by 2 commits.
  (use "git push" to publish your local commits)
Changes to be committed:
  (use "git reset HEAD <file>..." to unstage)

        modified:   1.txt
        new file:   2.txt

Changes not staged for commit:
  (use "git add <file>..." to update what will be committed)
  (use "git checkout -- <file>..." to discard changes in working directory)

        modified:   1.txt
현재 1.txt의 각 내용은 저장소별로 아래와 같습니다.
| Working Directory |
Staging Area |
Git Repository |
| v3 |
v2 |
v1 |
git diff 명령을 통해 아래와 같이 확인할 수 있습니다.
$ git diff 1.txt
diff --git a/1.txt b/1.txt
index 8c1384d..29ef827 100644
--- a/1.txt
+++ b/1.txt
@@ -1 +1 @@
-v2
+v3
warning: LF will be replaced by CRLF in 1.txt.
The file will have its original line endings in your working directory.

$ git diff HEAD 1.txt
diff --git a/1.txt b/1.txt
index 626799f..29ef827 100644
--- a/1.txt
+++ b/1.txt
@@ -1 +1 @@
-v1
+v3
warning: LF will be replaced by CRLF in 1.txt.
The file will have its original line endings in your working directory.