31 Jan 2017
|
data-modeling
데이터 모델링이란?
시스템 구축을 위해 업무의 데이터를 분석하는 방법, 명확하게 표현하는 추상화 기법
중요성
- 파급효과(Leverage) : 데이터 구조가 프로젝트 막바지에 바뀌게 되면 영향도가 큽니다.
- 요구사항의 간결한 표현(Conciseness) : 요구사항 파악하기 좋고, 많은 관련자들이 소통하기 좋습니다.
- 데이터 품질(Data Quality) : 데이터는 시스템의 자산. 정확성이 떨어지는 데이터는 가치가 없습니다.
유의점
중복을 피하고, 유연해야하며, 일관성있어야 합니다.
데이터 모델링 단계
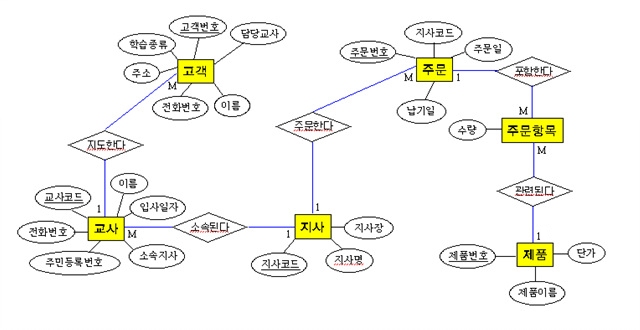
- 개념적 데이터 모델링 : 핵심 엔터티와 그들 간의 관계를 찾고 엔터티-관계 다이어 그램을 생성합니다.
※ 출처 : http://dbteam6.pbworks.com/f/1179078501/%EC%A7%84%EC%A7%9C%EC%A7%84%EC%A7%9C%EC%B5%9C%EC%A2%85.jpg
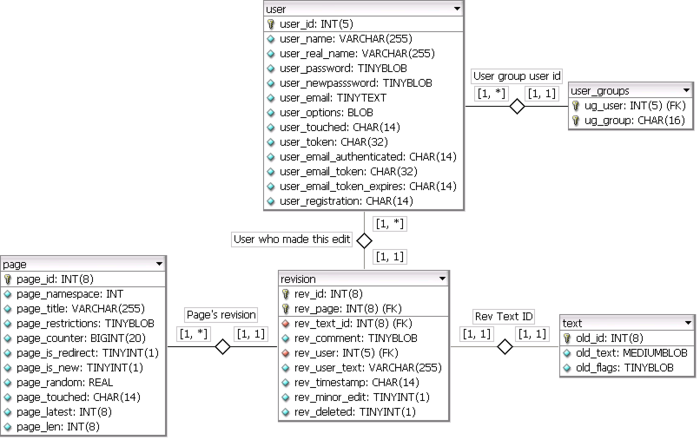
- 논리적 데이터 모델링 : 실질적으로 프로젝트에서 사용할 비지니스 정보의 논리적인 구조와 규칙을 명시하는 단계로 실질적으로 모델링을 완료하는 단계입니다.(정규화 활동이 포함)

※ 출처 : http://cfs9.tistory.com/upload_control/download.blog?fhandle=YmxvZzE5NDM0MkBmczkudGlzdG9yeS5jb206L2F0dGFjaC8wLzc5LmdpZg%3D%3D
- 물리적 데이터 모델링 : 논리모델에서 설계된 내용을 실제 물리적으로 어떻게 표현될지를 정합니다.
※ 출처 : https://upload.wikimedia.org/wikipedia/commons/thumb/b/b4/Data_model_in_ER.png/700px-Data_model_in_ER.png
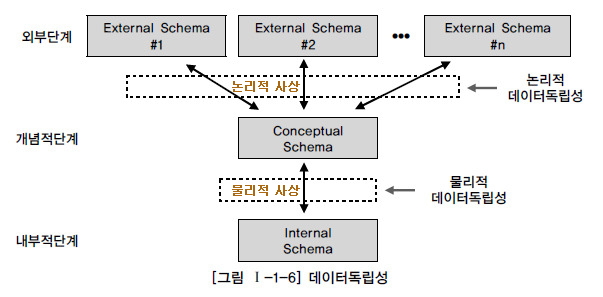
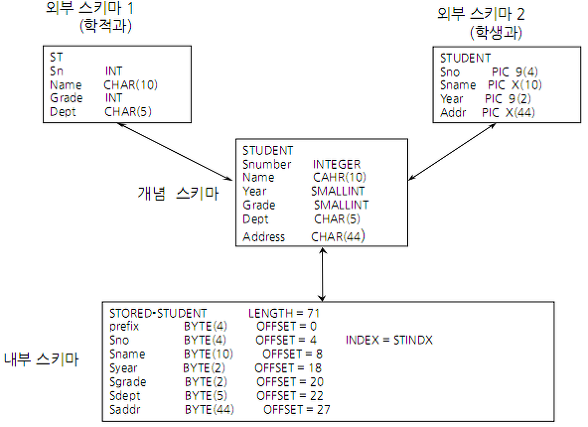
데이터 모델링 구조 및 독립성
데이터 모델링의 구조와 독립성에 대한 여러가지 설명이 있지만 아래 두 그림으로 딱 설명이 되는것 같습니다.
※ 출처 : http://cfile28.uf.tistory.com/image/2119243556BD75431EB784
※ 출처 : http://cfile233.uf.daum.net/image/2056933C4F60B0312DC599
- 외부스키마(외부단계)는 S/w, 개발자가 직접 접근하는 DB View입니다.
- 개념스키마(개념적단계)는 전체 DB를 기술합니다.
- 내부스키마(내부적단계)는 물리적 장치에 데이터가 실제적으로 저장되는 방법을 표현합니다.
각 독립성은 각 스키마가 변경되더라도 서로 영향을 끼치지 않아야 한다는 의미입니다.
- 논리적 독립성 : 개념스키마가 변해도 외부스키마는 변하지 않도록 지원해야함.
- 물리적 독립성 : 내부스키마가 변해도 개념스키마가 변하지 않도록 지원해야함.
사상은 Mapping이라고 부르는것이 더 이해하기 쉽습니다. 각 저장구조가 바뀐다면 Mapping정보가 바뀌어야 독립성이 유지됩니다.
- 논리적사상 : 외부뷰는 개념뷰에서 Mapping된 정보
- 물리적사상 : 개념뷰는 내부뷰에서 Mapping된 정보
30 Jan 2017
|
git
git log의 유용하게 쓰이는 몇몇 옵션들을 정리해 봅니다.
자세한 사용법은 Git의 기초 - 커밋 히스토리 조회하기를 참고하세요.
출력 log 제한
git log -(n)
최근 N개의 log만 출력합니다.
$ git log -2 --pretty=oneline
7343a5f82686c8c94800ddf8d2cffb30f6160243 modify m3
5a65f7acf00b6c18285bc0396d463f6a7c506c91 modify m2
git log --since[after,until,before]
특정 날짜 이전/이후 commit만 조회합니다.
$ git log --since="2017-01-29"
commit 7343a5f82686c8c94800ddf8d2cffb30f6160243
Author: unknown <pptwenty@gmail.com>
Date:   Mon Jan 30 22:54:30 2017 +0900

    modify m3
git log --author[committer]
특정 저자/커미터의 commit만 조회합니다.
$ git log --author=unknown
commit 7343a5f82686c8c94800ddf8d2cffb30f6160243
Author: unknown <pptwenty@gmail.com>
Date:   Mon Jan 30 22:54:30 2017 +0900

    modify m3
git log -- [path1] [path2] ...
특정 경로(폴더or파일)의 변경사항에 대해서만 조회합니다.
$ git log -p -- ./w.txt ./v.txt ./work
commit 169f19e36a4360c6a587e146a104e092a62ffc04
Author: unknown <pptwenty@gmail.com>
Date:   Mon Jan 30 23:32:48 2017 +0900

    work add

diff --git a/work/w1.txt b/work/w1.txt
new file mode 100644
index 0000000..e69de29

commit 6b1dbc9c20ad9be3cea60e4cf467328141b17180
Author: unknown <pptwenty@gmail.com>
Date:   Sun Jan 29 23:49:28 2017 +0900

    v2

diff --git a/v.txt b/v.txt
index 626799f..8c1384d 100644
--- a/v.txt
+++ b/v.txt
@@ -1 +1 @@
-v1
+v2
diff 내용 같이 보기
git log -p --word-diff --stat
| 옵션 |
설명 |
-p |
각 commit의 diff결과를 줄 단위로 보여줍니다. |
--word-diff |
-p옵션과 같이 사용하면 diff결과를 단어 단위로 보여줍니다.
변경된 단어 단위별로 [- -]{+ +}와 같이 괄호로 쌓아 보여줍니다. |
--stat |
각 commit의 변경사항에 대한 통계정보를 보여줍니다. |
--shortstat |
각 commit의 변경사항에 대한 통계정보중 변경/추가/삭제 개수만 보여줍니다. |
$ git log -p --word-diff --stat -1
commit 7343a5f82686c8c94800ddf8d2cffb30f6160243
Author: unknown <pptwenty@gmail.com>
Date:   Mon Jan 30 22:54:30 2017 +0900

    modify m3
---
 m.txt | 2 +-
 1 file changed, 1 insertion(+), 1 deletion(-)

diff --git a/m.txt b/m.txt
index 5895249..86afc2c 100644
--- a/m.txt
+++ b/m.txt
@@ -1,4 +1,4 @@
m3
m4-1
[-m5-2-]{+m5-3+} mmmmmm [-aaaaaa-]{+aaxxaa+}
m6
출력 log내용 형식 변경
git log --pretty=[OPTION] --abbrev-commit
--pretty옵션 값은 oneline, short, full, fuller가 있습니다.
oneline은 commit 내용을 한 줄로 표시(Hash값 , log 메시지)하며 나머지 옵션은 기본 log정보에서 추가정보를 가감합니다.
--abbrev-commit는 log HASH키 값을 처음 몇 자만 보여주도록 합니다.
※ --pretty=oneline --abbrev-commit의 경우 --oneline으로 대신 쓸 수 있습니다.
$ git log --pretty=oneline -1
7343a5f82686c8c94800ddf8d2cffb30f6160243 modify m3
$ git log --pretty=oneline --abbrev-commit -1
7343a5f modify m3
$ git log --pretty=fuller -1
commit 7343a5f82686c8c94800ddf8d2cffb30f6160243
Author:     unknown <pptwenty@gmail.com>
AuthorDate: Mon Jan 30 22:54:30 2017 +0900
Commit:     unknown <pptwenty@gmail.com>
CommitDate: Mon Jan 30 22:54:30 2017 +0900

    modify m3
git log --pretty=format:"%h %s" --graph
--pretty=format옵션은 필요한 정보에 대해 특정 format으로 표시하는데 %h는 log의 HASH키 값을 줄여서 보여주며 %s는 log 메시지를 보여줍니다.
※HASH키 전체값을 보고 싶을 경우 %H옵션을 사용합니다.
--graph 옵션은 branch와 merge한 내역을 시각화 하여 보여줍니다.
$ git log --pretty=format:"%h %s" --graph
* 7343a5f modify m3
* 5a65f7a modify m2
* 01c75b6 modify m
*   ae65735 Merge branch 'work2'
|\
| * 6b1dbc9 v2
| * aa8dc59 v1
|/
*   0604c1e Merge branch 'work1'
|\
| * 277030f w2
| * 4d72d03 w1
|/
* 4283fad m3
* 08e8d8d m2
* 4820c18 m1
29 Jan 2017
|
git
cherry-pick과 rebase에 대해 공부한 내용을 정리해 봅니다.
위 두 명령어는 누군가와 협업하여 소스를 관리할 때 유용한 명령어로 남의 작업과 나의 작업을 합치게 될 때 사용하게 됩니다.
cherry-pick
특정 commit에 대한 이력을 가져옵니다.
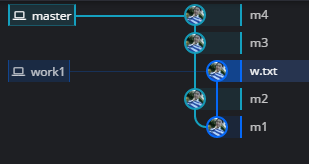
위와 같은 상황에서 work1 branch에 master에 commit된 m3가 필요할 경우 아래와 같이 cherry-pick 명령어를 통해 추가할 수 있습니다.
[master]
$ git log --pretty=format:"%h %s"
fa16562 m4
94c79c0 m3
3654326 m2
f56f92a m1


[work1]
$ git cherry-pick 94c79c0

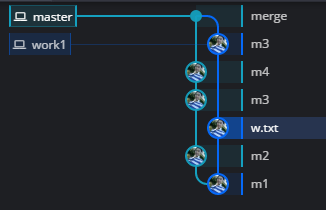
이때 cherry-pick으로 가져온 m3는 master의 m3와는 별개의 commit으로 work1 과 master를 merge 할 경우 아래와 같이 별도 commit으로 보이게 됩니다.
위와 같이 cherry-pick을 쓰는 경우를 예로 들면
여럿이 작업중 누군가가 공통 UTIL을 만들어 배포할 경우 해당 UTIL을 자신의 branch에 추가하는등의 작업과 같이 사용하게 됩니다.
rebase
branch를 master(또는 다른 branch)로 합치기 전에 이력을 보기 좋게 만드는데 사용하게 됩니다.
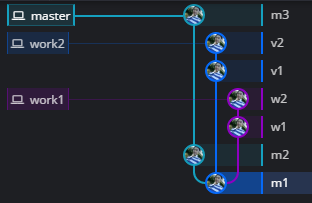
위와 같이 다수의 branch에서 작업하다가 merge하는 경우 서로 이력이 꼬여 보기 좋지 않을 때가 있습니다.
이 때 각 branch에서 rebase를 통해 commit 이력을 끌어오면 아래와 같이 예쁘게 이력을 정렬 가능합니다.
[work1]
$ git rebase master
$ git log --pretty=format:"%h %s"
277030f w2
4d72d03 w1
4283fad m3
08e8d8d m2
4820c18 m1
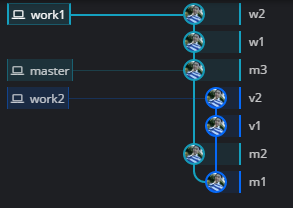
work1의 이력에 위와 같이 master의 m2,m3가 commit이력에 추가된 것을 볼 수 있습니다. git log를 통해서 commit된 hash값을 보아도 같은 값인것으로 보아 work1의 branch 생성 시점이 master의 현재 HEAD부분으로 이동했다고 봐도 무방할것 같습니다.
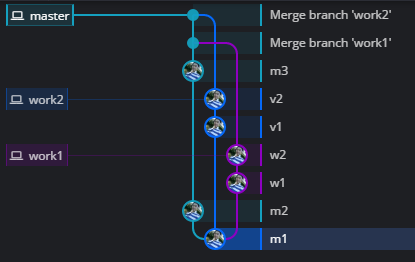
$ git merge --no-ff work1
위와 같이 merge하게 되면 아래 그림과 같이 예쁘게 merge가 됩니다.
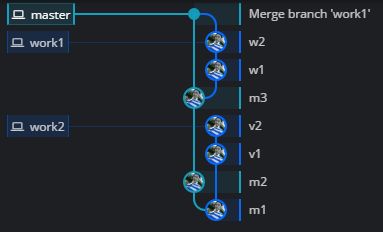
work2도 같은 방식으로 merge하면 최종적으로 아래와 같이 보기 좋게 merge됩니다.

28 Jan 2017
|
git
git init
저장소에 필요한 Seleton파일을 가지고 있는 “.git”이라는 하위 디렉토리를 만들어줍니다.
※ 아직 프로젝트의 어떤한 파일도 관리하지 않는 상태이며 commit, add등의 명령어로 파일을 추가해야합니다.
$ git init        // 현재 디렉토리에 .git 폴더를 생성합니다.
$ git init work1  // ./work1 디렉토리에 .git 폴더를 생성합니다.
–bare
Bare저장소를 생성합니다.
Bare저장소는 워킹디렉토리가 없는 저장소로 디렉토리는 관례에 따라 .git확장자로 끝납니다.
$ git init --bare <project_name>.git
git clone –bare (src-project) (bare-project)
이미 git init을 통해 이미 관리되고 있는 프로젝트의 Bare저장소로 만들고 싶을 경우 아래와 같이 사용할 수 있습니다.
$ git clone --bare test test_bare.git
$ ls ./test_bare
config  description  HEAD  hooks/  info/  objects/  packed-refs  refs/
git clone (path) [project-name]
Bare저장소로부터 프로젝트를 로컬에 복사하고 싶을 경우 아래와 같이 사용할 수 있습니다.
(path)는 파일 경로도 가능하고 URL경로도 가능합니다.
$ git clone ./test_bare.git test
$ git clone file://d/work/test_bare.git test
$ git clone https://github.com/jistol/jistol.github.io jistol-project
$ git clone git://127.0.0.1:7777/jistol/jistol.github.io jistol-project
$ git clone ssh://127.0.0.1:22/jistol/jistol.github.io jistol-project
git clone -b (branch-name) (path) [project-name]
Bare저장소의 특정 branch를 로컬에 복사하고 싶을 경우 아래와 같이 사용할 수 있습니다.
$ git clone -b work1 file://d/work/test_bare.git localwork1
27 Jan 2017
|
git
git branch명령은 branch 생성및 제거, 확인등의 기능을 하는 명령어로 주요 명령어만 요약하였습니다.
자세한 내용은 git-scm Git-브랜치-브랜치-관리에서 확인하세요.
git branch [-l]
로컬 branch 정보를 보여줍니다. (-l 옵션은 생략가능)
$ git branch
* master
  work1
git branch -v
로컬 branch의 정보를 마지막 커밋 내역과 함께 보여줍니다.
$ git branch -v
* master   4bbc62f commit message 'm1'
  work1    fe7f049 commit message 'w1'
  work_new 4bbc62f commit message 'work_new1'
git branch -r
리모트 저장소의 branch 정보를 보여줍니다.
$ git branch -r
  origin/master
  origin/work1
git branch -a
로컬/리모트 저장소의 모든 branch 정보를 보여줍니다.
$ git branch -a
* master
  work1
  remotes/origin/master
  remotes/origin/work1
git branch (이름)
로컬에 새로운 branch를 생성합니다.
$ git branch work_new
$ git branch -a
* master
  work1
  work_new
  remotes/origin/master
  remotes/origin/work1
※ 생성과 동시에 해당 branch로 이동하려면 아래 명령어를 사용합니다.
※ 원격에 있는 branch를 가져오려면 아래 명령어를 사용합니다.
[특정이름 지정시]
$ git checkout -b work2 origin/work2
[원격 branch 이름을 그대로 사용할 경우]
$ git checkout -t origin/work2
git branch (–merged | –no-merged)
--merged는 이미 merge된 branch를 표시해주고 --no-merged는 아직 merge가 되지 않은 branch만 표시합니다.
--merged에 branch 목록 이미 merge되었기 때문에 *가 표시되지 않은 branch는 삭제 가능합니다.
$ git branch --merged
* master
  work_new
  work_old

$ git branch --no-merged
  work1
  work2
git branch -d (branch 이름)
branch를 삭제합니다. 아직 merge하지 않은 커밋을 담고 있는 경우 삭제되지 않습니다.(강제종료 옵션 -D으로만 삭제 가능)
$ git branch -d work3
error: The branch 'work3' is not fully merged.
If you are sure you want to delete it, run 'git branch -D work3'.

$ git branch -d work_new
Deleted branch work_new (was 4bbc62f).
git branch -m (변경할 branch이름) (변경될 branch이름)
A 브랜치를 B 브랜치로 변경합니다.
$ git branch -v
* master   4bbc62f m1
  work2    c728ddc w2
  work_old 4bbc62f m1

$ git branch -m work2 work3

$ git branch -v
* master   4bbc62f m1
  work3    c728ddc w2
  work_old 4bbc62f m1
※ -M 옵션을 사용할 경우 기존에 동일한 이름의 branch가 있더라도 덮어씁니다.