React Component의 생명주기에 대해 정리하고 테스트 예제를 포스팅합니다.
참고로 version 17부터 deprecated 되는 항목(componentWillMount, componentWillUpdate, componentWillReceiveProps)은 제외했습니다.
위 3개의 lifecycle은 오용되는 케이스가 많아 삭제 되었으며 ‘UNSAFE_‘라는 prefix를 붙여 메소드가 남아있는 상태로 자세한 내용은 Update on Async Rendering문서를 참고하세요.
React 버전에 따라 생명주기가 살짝 다른데 아래 그림을 참고하세요.
React v16.3 : https://code.likeagirl.io/understanding-react-component-life-cycle-49bf4b8674de
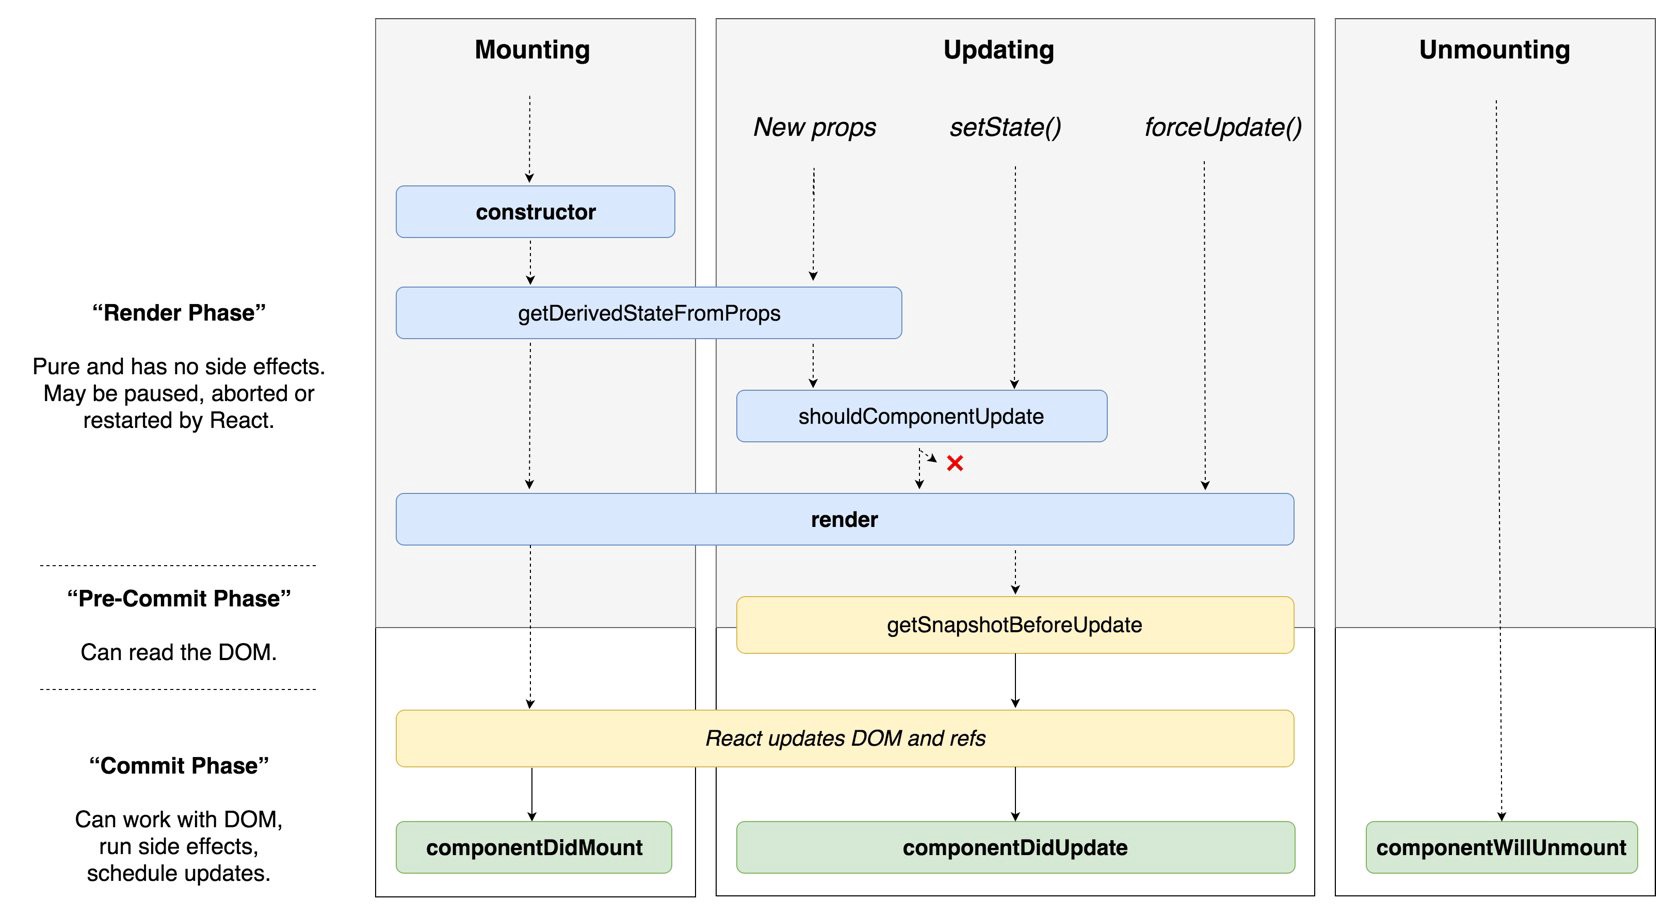
React v16.4 : https://medium.com/@nancydo7/understanding-react-16-4-component-lifecycle-methods-e376710e5157
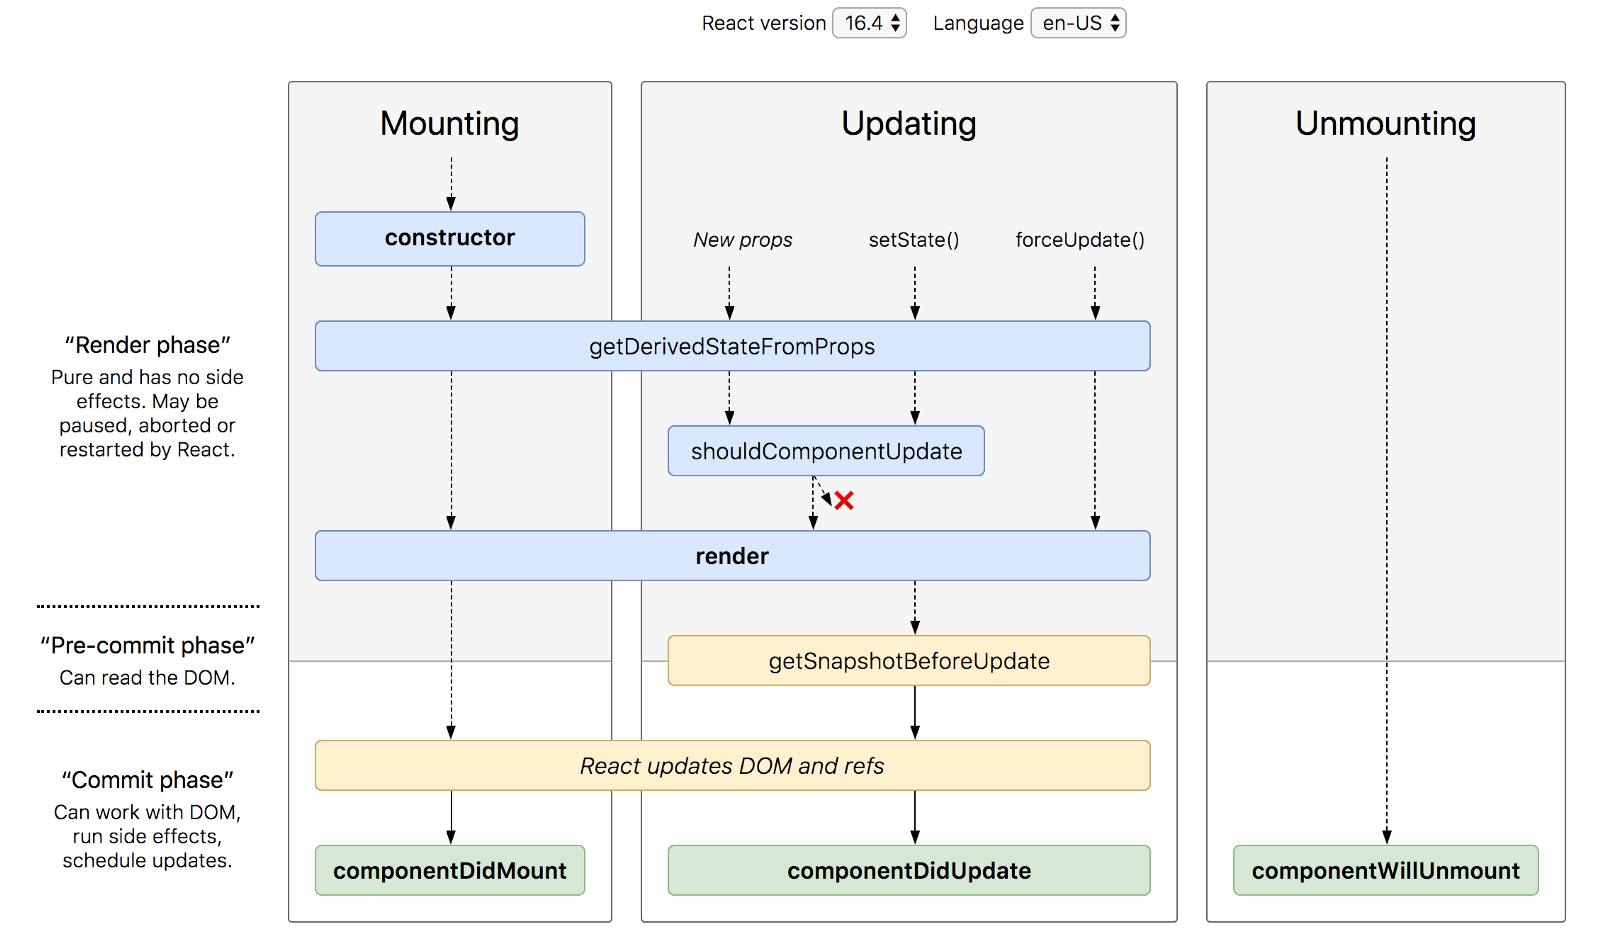
위 그림과 같이 React Component의 생명주기는 실행 이벤트 관점에서 “mount/update/unmount”로 구분 할 수 있으며 실행 단계 관점에서는 “랜더링전/DOM 반영전/DOM 반영이후”로 구분 할 수 있습니다.
아래 메서드들은 실행 순서 보다는 “일반적으로 사용되는”, “드믈게 사용되는” 생명주기로 구분합니다. 버전별 일반 생명주기 메서드 표는 아래 링크를 참고하세요.
1. Commonly Used Lifecycle Methods
render()
React.Component에서 유일하게 필수 구현되어야 하는 함수입니다. 미구현시 아래와 같은 오류를 만나게 됩니다.
Warning: TodoApp(...): No `render` method found on the returned component instance: you may have forgotten to define `render`.

Uncaught TypeError: instance.render is not a function
이 메서드 안에서는 this.props와 this.state를 사용할 수 있으나 state의 값을 변경하면 안됩니다. 변경시 아래와 같은 오류를 만나게 됩니다.
Uncaught Error: Maximum update depth exceeded. This can happen when a component repeatedly calls setState inside componentWillUpdate or componentDidUpdate. React limits the number of nested updates to prevent infinite loops.
반환 값으로 일반적으로 DOM노드를 반환하나 아래와 같이 여러종류의 데이터를 넘길 수 있습니다.
1. React Element
- JSX타입의 요소를 반환할 수 있습니다.
- 반환시 최상위 DOM은 단일노드여야 합니다.
render() {
  return <div> ... </div>;
}

render() {
  return <MyComponent/>;
}

// error case
render() {
  return <div>1</div><div>2</div>;
}
/**
* Uncaught SyntaxError: Inline Babel script: Adjacent JSX elements must be wrapped in an enclosing tag
*/
2. Fragment
- 특정 태그로 묶고 싶지 않다면 태그로 묶어 반환할 수 있습니다.
- 해당 태그로 묶을 경우 렌더링시 Fragment태그는 제거됩니다.
render() {
  return (
    <div>
      <div>1</div>
      <div>2</div>
    </div>
  );
}
/**
* Result
* <div id="app">
*   <div>
*     <div>1</div>
*     <div>2</div>
*   </div>
* </div>
*/

render() {
  return (
    <React.Fragment>
      <div>1</div>
      <div>2</div>
    </React.Fragment>
  );
}
/**
* Result
* <div id="app">
*   <div>1</div>
*   <div>2</div>
* </div>
*/
3. Portal
- ReactDOM.createPortal 메서드를 이용하여 다른 DOM의 서브트리로 만들수 있습니다.
- 반드시 리턴 할 경우에만 적용됩니다.
- 일반 렌더링값과는 달리 해당 DOM의 하위 노드를 제거후 렌더링하는것이 아니라 서브 노드로 추가가 됩니다.
// 본 컴포넌트가 속한 부모 노드 하위가 아닌 #portal 노드 하위에 그려집니다.
render() {
    let domNode = document.querySelector("#portal");
    return ReactDOM.createPortal(
        <div>Portal</div>,
        domNode
    );
}
// 아래와 같은 경우 아무것도 그려지지 않습니다.
render() {
    let domNode = document.querySelector("#portal");
    ReactDOM.createPortal(
        <div>Portal</div>,
        domNode
    );
    return true;
}
Portal의 경우 컴포넌트가 속하지 않은 노드에 렌더링을 할 수 있게 하는데 다음과 같은 경우에 사용하기 유용합니다.
ex) dialog, hovercard, tooltips …
자세한 가이드는 React Portals 문서를 참고하세요.
4. String, Number
- 문자열이나 숫자를 반환 할 수 있으며 TextNode로 렌더링 됩니다.
render() {
  return 'Text';
}
/**
* Result
* <div id="app">Text</div>
*/
5. boolean, null
- boolean(true/false)값이나 null값 역시 반환 가능합니다.
- 반환시 화면에 아무것도 안그리는 것으로 보일수 있으나 사실상 공백을 그려줍니다. 렌더링되는 요소 하위에 다른 요소가 존재한다면 삭제 됩니다.
- 심지어 undefined도 가능합니다. 테스트 해보면 에러는 안나지만 공식문서에 undefined는 명시되 있지 않습니다.
6. Array
- 배열을 반환할 수 있습니다.
- 배열 요소들은 렌더링 가능한 모든 타입이 가능합니다. (function은 불가능합니다.)
- 컴포넌트 배열을 렌더링 할 경우 어떤 원소에 변동이 있는지 알아내기 위해 각 원소에 고유 key가 포함되어야 합니다.
render() {
  return [
    "start",
    1234,
    false,
    null,
    <React.Fragment key="frag"><div key="1">1</div><div key="2">2</div></React.Fragment>,
    <b key="3">{this.state.status}</b>,
    ReactDOM.createPortal(
      <div>Portal</div>,
      this.props.portal
    )
  ];
}
constructor(props)
constructor(props) {
  super(props);
  // Don't call this.setState() here!
  this.state = { counter: 0 };
  this.handleClick = this.handleClick.bind(this);
}
컴포넌트 생성자로 생성시 맨 처음에 실행하게 되는데 props를 인자로 받는데 React.Component를 상속했을 경우 반드시 super(props);를 호출해야합니다.
그리고 constructor는 유일하게 this.state 를 직접 할당하는 메서드입니다. 이 메서드 안에서는 setState()를 호출하지 말아야 합니다. 호출시 아래와 같은 오류가 발생합니다.
그 외 이벤트를 해당 인스턴스로 바인드 하는 등의 작업을 할 수 있습니다.
Warning: Can't call setState on a component that is not yet mounted. This is a no-op, but it might indicate a bug in your application. Instead, assign to `this.state` directly or define a `state = {};` class property with the desired state in the YourApp component.
componentDidMount()
Component가 DOM트리에 마운트 될 때 실행되며 일반적으로 DOM노드가 필요한 초기화 작업은 본 메서드에서 실행해야 합니다. 또한 여기서 실행한 트리거나 이벤트, 비동기 작업등은 componentWillUnmount메서드에서 만드시 해제 해주는 것이 좋습니다.
componentDidMount() 메서드에도 안티패턴이 존재하는데 아래와 같은 케이스입니다.
componentDidMount() {
  ...
  this.setState({ ... });
}
위와 같이 호출 가능하나 화면을 업데이트 하기 전에 추가 렌더링이 발생하므로 뷰에는 중간 상태를 나타내지 않으며 성능상 이슈를 발생하기도 합니다.
하지만 DOM에 렌더링 되기 전에 크기 측정이 필요 할 경우 위와 같이 사용 할 수도 있습니다. (ex. 툴팁이나 모달창등을 만들때.. )
componentDidUpdate(prevProps, prevState, snapshot)
리렌더링 발생 이후 실행되며 초기 렌더링 시에는 실행되지 않습니다. DOM업데이트가 완료된 이후에 실행되므로 DOM관련 처리를 해도 됩니다.
그리고 이전 상태의 props/state값과 getSnapshotBeforeUpdate()메서드를 통해 전달 받은 데이터가 넘어오기 때문에 이전 상태와 현 상태의 변화에 따른 네트워크 작업을 하기에 좋습니다.
단, 주의해야할 점은 본 메서드에서 setState()를 실행할 수 있으나 제약조건없이 실행 할 경우 무한루프에 빠질 수 있습니다.
componentWillUnmount()
Component가 DOM에서 제거되고 파기 되기 직전에 호출 됩니다. 본 Component에서 구독한 이벤트나 트리거등을 제거할때 사용되며 Component가 리렌더링 되지 않기 때문에 setState()를 호출 할 수 업습니다.
2. Rarely Used Lifecycle Methods
shouldComponentUpdate(nextProps, nextState)
본 메서드에서 리렌더링 여부를 결정하는 메서드로 새로운 props/state 데이터를 받을 경우 동작하며, 초기 렌더링시나 forceUpdate()를 통한 리렌더링시에는 동작하지 않습니다.
재정의 하지 않을 경우 기본적으로는 모든 변경시마다 리렌더링을 실행하며 false를 반환 할 경우 render() 메서드를 실행하지 않습니다.
shouldComponentUpdate메서드는 보통 성능 최적화를 위해 특정 값의 변경에 따라서만 리렌더링을 조절가능하나 버그를 양산하기 쉽기 때문에 대신 React.PureComponent를 사용할 것을 권장하고 있습니다.
PureComponent는 shouldComponentUpdate()메서드가 이미 구현되어 있는 클래스로 React.Component 대신 상속 받아 사용할 경우 props/state의 변화시 얕은 비교를 통해 변경된 것이 있을 경우에만 리렌더링을 해줍니다.
PureComponent및 성능 최적화에 관련된 내용은 아래 링크를 참고하세요.
리액트 성능 향상 시키기 - React.PureComponent : https://wonism.github.io/react-pure-component/
Optimizing Performance : https://reactjs.org/docs/optimizing-performance.html
getDerivedStateFromProps(nextProps, prevState)
React v16.3이후 새로 생긴 메서드로 모든 render()메서드 실행 전에 시작됩니다.
업데이트가 필요한 state값을 반환하거나 null을 반환해야 하고 본 메서드는 static 메서드로 Component에 직접 접근 할 수 없습니다.
레퍼런스 문서에는 getDerivedStateFromProps 메서드의 용도를 오직 props의 변화에 따른 state 상태 변화를 위한 용도로만 정의하고 있습니다.
이를 위해 일부 개발자가 양산하는 아래와 같은 버그를 막는 용도로 설명하고 있으며 더 자세한 내용은 You Probably Don’t Need Derived State에서 확인 할 수 있습니다.
constructor(props) {
 super(props);
 // Don't do this!
 this.state = { color: props.color };
}
위 예제는 props값을 직접 참조함으로써 props값이 변할 때 마다 state에 영향을 미치길 바라지만 실제로는 변경되지 않습니다.
하지만 아래와 같이 getDerivedStateFromProps 메서드를 이용하면 props값이 변경시마다 getDerivedStateFromProps 메서드를 호출하기 때문에 state값을 변경 가능합니다.
static getDerivedStateFromProps(nextProps, prevState) {
  if (nextProps.status != prevState.status) {
    return { status : nextProps.status };
  }

  return null;
}
getSnapshotBeforeUpdate(prevProps, prevState)
React v16.3이후 새로 생긴 메서드로 render()메서드 호출 이후 DOM트리에 반영전에 호출 됩니다.
특정 동작에 따른 Component의 변화가 적용 되기전에 이전 scroll position와 같은 이전 상태의 snapshot을 남겨 넘길수 있는데 이 때 리턴된 값은 componentDidUpdate() 메서드에 전달 됩니다. 재정의 하지 않을 경우 기본값은 null이 리턴됩니다.
잘못 사용하는 케이스로 본 메서드에서 현재 렌더링된 DOM의 데이터를 읽어들이는 케이스가 있습니다.
getSnapshotBeforeUpdate(prevProps, prevState) {
  if (prevProps.list.length < this.props.list.length) {
    const list = this.listRef.current;
    return list.scrollHeight - list.scrollTop;
  }
  return null;
}
위와 같이 사용할 경우 render과정과 commit과정 사이의 딜레이가 존재하기 때문에 원하는 결과를 얻을수 없습니다. 본 메서드에서는 과거 상태만을 반환하고 componentDidUpdate()메서드에서 처리하는 것이 좋습니다.
3. Example
위 생명주기를 테스트 해 볼수 있는 샘플 코드입니다.
4. 그 외…
Error Handling : https://reactjs.org/docs/error-boundaries.html