JVM 구조 정리
10 Feb 2017 | jvm그 동안 미뤄왔던 JVM의 기본 구조에 대해 여기 저기 사이트를 참고하여 최종 구조를 그려보았습니다. 여기서 제일 고민했던 부분은 보통 Heap의 Permanent Area로 불리는 영역이 Method Area와 별개인가? 하는 점이였는데 최종 결론은 같은 영역이다!! 라고 결론을 내렸습니다. (RUNTIME DATA AREAS – JAVA’S MEMORY MODEL)참고
JVM 구조
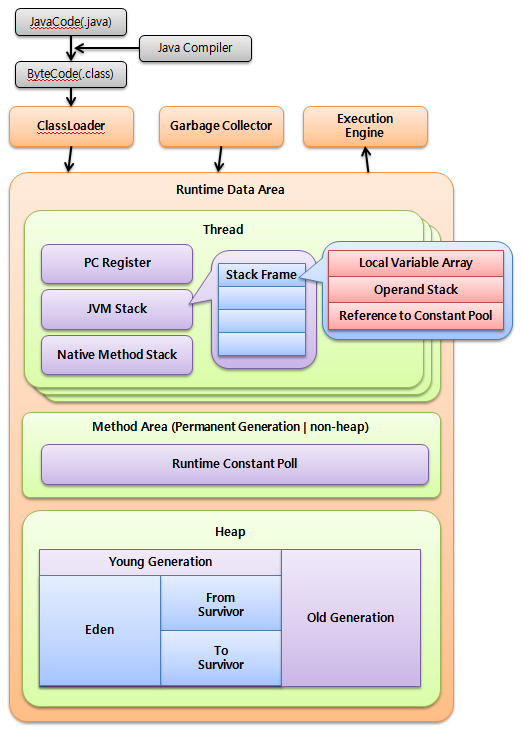

그 동안 미뤄왔던 JVM의 기본 구조에 대해 여기 저기 사이트를 참고하여 최종 구조를 그려보았습니다. 여기서 제일 고민했던 부분은 보통 Heap의 Permanent Area로 불리는 영역이 Method Area와 별개인가? 하는 점이였는데 최종 결론은 같은 영역이다!! 라고 결론을 내렸습니다. (RUNTIME DATA AREAS – JAVA’S MEMORY MODEL)참고
Spring Cache는 @Cacheable어노테이션만 붙이면 알아서 인자값을 종류에 맞게 캐쉬된 데이터를 사용합니다.
@Cacheable
public List<String> getList(int page, String query){ ... }
위와 같은 경우 두 인자값이 모두 같아야 같은 캐쉬값을 내보내는데 리턴값에 영향을 미치는 요소가 page 인자값만 영향을 미친다면 아래와 같이 캐쉬 키값을 별도로 설정 할 수 있습니다.
@Cacheable(key = "#page")
public List<String> getList(int page, String query){ ... }
#인자값이름으로 특정 인자를 지정할 수 있는데 위와 같이 하면 같은 page값일 경우 query인자값은 어떤 값이 들어오더라도 같은 캐쉬값을 반환합니다.
그런데 아래와 같은 경우 캐쉬가 정상적으로 동작하지 않습니다.
class Person
{
  private String name;

  public String getName(){ return name; }
}

@Cacheable(key = "#kim")
public List<String getList(Person kim){ ... }
이유는 Spring 4.0 이전 버전에서 사용하는 기본 KeyGenerator인 DefaultKeyGenerator가 아래와 같은 방식으로 키를 생성하기 때문입니다.
Spring Cache Abstraction Default Key Generation - 원문보기
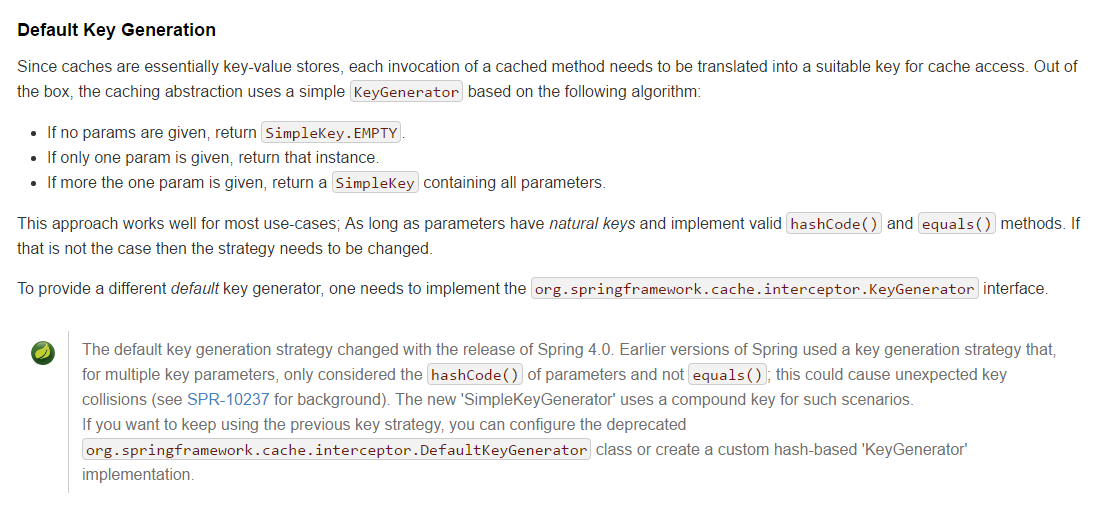
객체의 native값을 이용하거나 Object일 경우 hashCode()만을 사용하여 키 값을 생성하는데 Object의 hachCode는 객체에서 재정의 하지 않은 이상 무조건 다른 값이 들어가게 되기 때문입니다.
Spring 4.0 이후 버전에서의 기본 KeyGenerator는 SimpleKeyGenerator를 사용하며 hashCode만이 아닌 복합키를 사용한다고 합니다.
인자값이 Object 객체인 경우 객체내 값을 이용하여 키 값을 쓸 수 있습니다.(물론 이 때 내부 값도 native값이거나 String같은 heap내 주소가 유일한 경우에만 가능합니다.)
@Cacheable(key = "#kim.name")
public List<String getList(Person kim){ ... }
인자값이 null일 경우를 체크하려면 아래와 같이 사용할 수 있습니다.
@Cacheable(key = "#kim?.name")
public List<String getList(Person kim){ ... }
위 식은 if-then-else 구문에서 else만 빠진것으로 전부 표시하면 아래 같이도 사용 가능합니다.
@Cacheable(key = "#kim?.name:'Unknown'")
public List<String getList(Person kim){ ... }
특정 메소드를 사용하고 싶다면 아래와 같이 사용할 수도 있습니다.
@Cacheable(key = "#kim.getName()")
public List<String getList(Person kim){ ... }
List나 Map값은 객체들은 hachCode값을 이미 내부 객체의 hashCode값들을 이용하여 정해진 규칙대로 만들기 때문에 아래의 경우에는 별도의 처리 없이 사용가능합니다. 하지만 내부에 포함된 데이터가 native타입이 아닐 경우엔 List, Map도 문제가 생깁니다.
@Cacheable(key = "#strList")
public List<String getListByList(List<String> strList){ ... }

@Cacheable(key = "#map")
public List<String getListByMap(Map<Long, String> map){ ... }
마지막으로 인자값이 여러개 있을 경우에 표시하는 예제는 아래와 같습니다.
@Cacheable(key = "'KeyIs' + #kim?.getName():'Unknown' + #page + #list")
public List<String getList(Person kim, int page, List<String> list){ ... }
key값에 사용되는 문법은 sqEL 표현식으로 아래 링크에서 자세한 내용은 확인 가능합니다.
Git을 사용하다보면 branch이름을 바꿔야 할 때가 있습니다.
아래 명령어로 로컬 branch를 간단히 바꿀 수 있습니다.
$ git branch -m [old-name] [new-name]
하지만 remote저장소에 있는 branch이름은 바꿀 수가 없는데 바꾸려면 remote저장소의 branch를 삭제하고 다시 로컬 branch를 이용하여 재생성해야합니다.
아래 명령어로 remote 브랜치를 삭제합니다.
$ git push [remote-name] --delete [old-branch-name]
로컬 저장소의 이름을 새 이름으로 변경 후 remote저장소에 새로 올립니다.
$ git branch -m [old-name] [new-name]
$ git push [remote-name] [new-name]
Total 0 (delta 0), reused 0 (delta 0)
To https://github.com/jistol/jistol.github.io.git
* [new branch]      new-name -> new-name
| 옵션 | 설명 |
|---|---|
| create | 기존에 생성되 있던 테이블들을 삭제하고 새로 만듭니다. |
| create-drop | create와 같은 동작을 하나 종료시에 DROP합니다. |
| update | 변경된 부분만 반영합니다. |
| validate | 테이블과 Entity가 매핑되는지 유효성 검사를 실행합니다. |
| none | 초기화 동작을 사용하지 않습니다. |
예시 : classpath:/sql/test/init-*.sql,file:/home/jistol/sql/test.sql,/META-INF/sql/initScript.sql
iBatis만 사용하다가 SpringData를 처음 접해보면 신세계를 느끼는 것 중 하나가 interface에 메소드 하나 정의 했는데 쿼리가 완성된다는 점이 아닐까 싶습니다. xml에 죽어라 SQL문 만들다가 이렇게 간단하게 해결되면 SpringData를 안쓸수가 없죠.(반대로 더 불편해지거나 힘든점도 있긴 합니다.)
그동안 사용해온 쿼리 메소드들에 대해 몇몇가지 정리해봅니다. 자세한 내용은 Spring Data JPA - Reference Documentation(1.10.7)영문이나 이쁘게 번역해놓은 번역본을 참고하시기 바랍니다.
| Keyword | Sample | JPQL snippet |
|---|---|---|
| And | findByLastnameAndFirstname | … where x.lastname = ?1 and x.firstname = ?2 |
| Or | findByLastnameOrFirstname | … where x.lastname = ?1 or x.firstname = ?2 |
| Is,Equals | findByFirstname,findByFirstnameIs,findByFirstnameEquals | … where x.firstname = 1? |
| Between | findByStartDateBetween | … where x.startDate between 1? and ?2 |
| LessThan | findByAgeLessThan | … where x.age < ?1 |
| LessThanEqual | findByAgeLessThanEqual | … where x.age ⇐ ?1 |
| GreaterThan | findByAgeGreaterThan | … where x.age > ?1 |
| GreaterThanEqual | findByAgeGreaterThanEqual | … where x.age >= ?1 |
| After | findByStartDateAfter | … where x.startDate > ?1 |
| Before | findByStartDateBefore | … where x.startDate < ?1 |
| IsNull | findByAgeIsNull | … where x.age is null |
| IsNotNull,NotNull | findByAge(Is)NotNull | … where x.age not null |
| Like | findByFirstnameLike | … where x.firstname like ?1 |
| NotLike | findByFirstnameNotLike | … where x.firstname not like ?1 |
| StartingWith | findByFirstnameStartingWith | … where x.firstname like ?1 (parameter bound with appended %) |
| EndingWith | findByFirstnameEndingWith | … where x.firstname like ?1 (parameter bound with prepended %) |
| Containing | findByFirstnameContaining | … where x.firstname like ?1 (parameter bound wrapped in %) |
| OrderBy | findByAgeOrderByLastnameDesc | … where x.age = ?1 order by x.lastname desc |
| Not | findByLastnameNot | … where x.lastname <> ?1 |
| In | findByAgeIn(Collection |
… where x.age in ?1 |
| NotIn | findByAgeNotIn(Collection |
… where x.age not in ?1 |
| True | findByActiveTrue() | … where x.active = true |
| False | findByActiveFalse() | … where x.active = false |
| IgnoreCase | findByFirstnameIgnoreCase | … where UPPER(x.firstame) = UPPER(?1) |
User findFirstByOrderByLastnameAsc();
User findTopByOrderByAgeDesc();
Page<User> queryFirst10ByLastname(String lastname, Pageable pageable);
Slice<User> findTop3ByLastname(String lastname, Pageable pageable);
List<User> findFirst10ByLastname(String lastname, Sort sort);
List<User> findTop10ByLastname(String lastname, Pageable pageable);
List<Person> findDistinctPeopleByLastnameOrFirstname(String lastname, String firstname);
List<Person> findPeopleDistinctByLastnameOrFirstname(String lastname, String firstname);