
[Spring] Spring Data Rest Respository 소개 및 샘플
24 Mar 2017 | spring springboot springdata rest jpa다른 작업을 하려고 Spring Initializr에서 프로젝트 생성중 “Rest Repository”라는 Dependency항목이 있어 먼가 하고 보다가 서칭한 내용을 정리해보았습니다. 아래 내용에 대한 샘플은 다음 주소에서 확인 할 수 있습니다.
https://github.com/jistol/sample/tree/master/ex-springdata-rest-sample
Spring Data Rest Respository
Spring Data Rest Respository는 Spring Data 프로젝트의 서브 프로젝트로 Repository의 설정만으로 REST API 서버를 구성해주는 신박한 기능입니다. 사용자는 Entity 클래스와 Repository 인터페이스만 작성하면 나머지 CRUD 작업은 모두 알아서 RESTful하게 생성됩니다.
SpringData REST의 주요 기능은 Data Repository로부터 Resource를 추출하는 것으로 핵심은 Repository 인터페이스입니다.
예를 들어 OrderRepository와 같은 Repository인터페이스가 있을 경우 소문자의 복수형 resource를 뽑아내어 /orders 를 만듭니다.
그리고 /orders/{id} 하위에 각 item을 관리할 수 있는 resource를 추출해 냅니다.
시작하기
Spring Initializr페이지에서 아래와 같이 Dependency를 선택하고 “Generate Project”를 눌러 zip으로 다운 받습니다.

압축을 풀어 프로젝트의 pom.xml파일을 보면 아래와 같이 Dependency가 포함되 있는 것을 확인 할 수 있습니다.
    <dependencies>
  		<dependency>
  			<groupId>org.springframework.boot</groupId>
  			<artifactId>spring-boot-starter-data-jpa</artifactId>
  		</dependency>
  		<dependency>
  			<groupId>org.springframework.boot</groupId>
  			<artifactId>spring-boot-starter-data-rest</artifactId>
  		</dependency>
  		<dependency>
  			<groupId>org.springframework.data</groupId>
  			<artifactId>spring-data-rest-hal-browser</artifactId>
  		</dependency>

  		<dependency>
  			<groupId>com.h2database</groupId>
  			<artifactId>h2</artifactId>
  			<scope>runtime</scope>
  		</dependency>
  		<dependency>
  			<groupId>org.springframework.boot</groupId>
  			<artifactId>spring-boot-starter-test</artifactId>
  			<scope>test</scope>
  		</dependency>
  	</dependencies>
SpringData REST 자체가 어떤 DB를 쓸 지에 대한 설정을 포함하고 있지 않기 때문에 따로 H2 DB를 사용하도록 추가해주었으며 구축된 REST를 쉽게 테스트 해보기 위해 HAL Browser를 추가하였습니다.
먼저 application.properties를 설정합니다.
    # SpringData REST의 기본 context path
    spring.data.rest.basePath=api

    # JPA 설정
    spring.jpa.hibernate.ddl-auto=create
    spring.jpa.show-sql=true

    # H2 DB설정
    spring.datasource.url=jdbc:h2:file:./db/devdb;AUTO_SERVER=TRUE
    spring.datasource.username=test
    spring.datasource.password=test
    spring.datasource.driver-class-name=org.h2.Driver

    spring.h2.console.enabled=true
    spring.h2.console.path=/console
Entity는 장바구니(Cart)클래스와 물건(Item)클래스를 만들도록 하겠습니다.
    @Entity
    public class Cart
    {
        @Id
        @GeneratedValue
        private int id;

        private String name;

        private boolean paid;

        @OneToMany(mappedBy = "cart")
        private List<Item> items;

        ....
    }

    @Entity
    public class Item
    {
        @Id
        @GeneratedValue
        private int id;

        private String name;

        private int price;

        @ManyToOne
        @JoinColumn(name = "CART_ID")
        private Cart cart;

        ....
    }
그리고 각 Entity의 Repository 인터페이스를 생성합니다.
SpringData REST Documentation 사이트에는 CrudRepository를 상속하도록 예제가 나오지만 JpaRepository를 이용해도 무방합니다.
    public interface CartRepository extends JpaRepository<Cart, Integer> {}

    public interface ItemRepository extends JpaRepository<Item, Integer> {}
코딩 할 작업은 모두 끝났습니다. 이제 돌려봅시다.
mvn clean package spring-boot:run
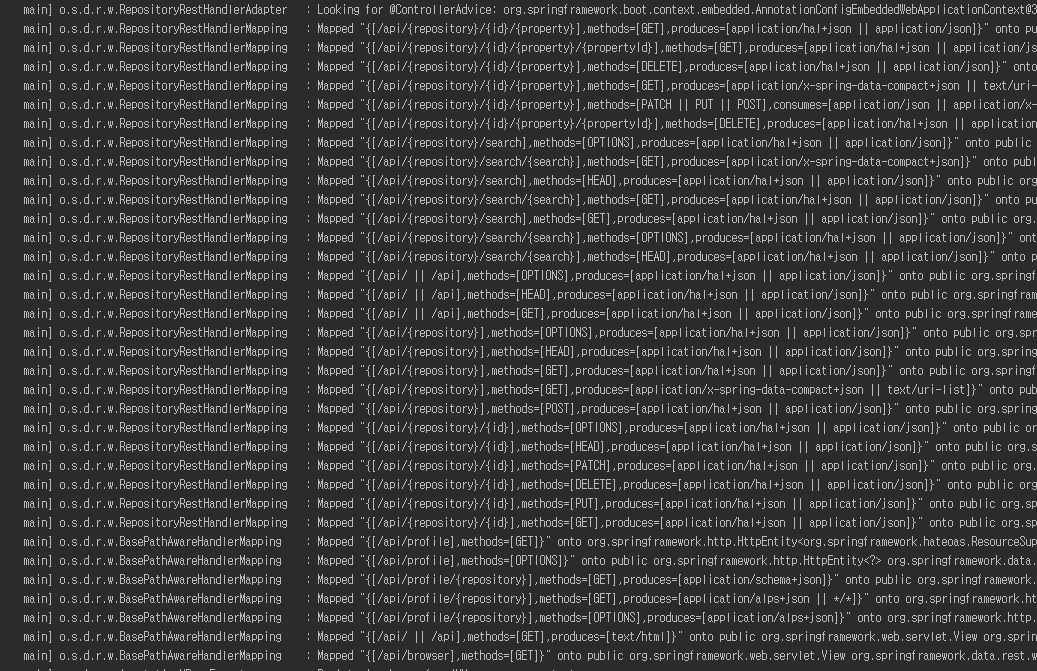
실행 로그를 보면 /api로 시작하는 Mapping정보들이 만들어지는것을 볼 수 있습니다.
HAL Browser를 통해 실제 Request를 날려봅시다. 아래 URL로 접속합니다.
http://localhost:8080/api
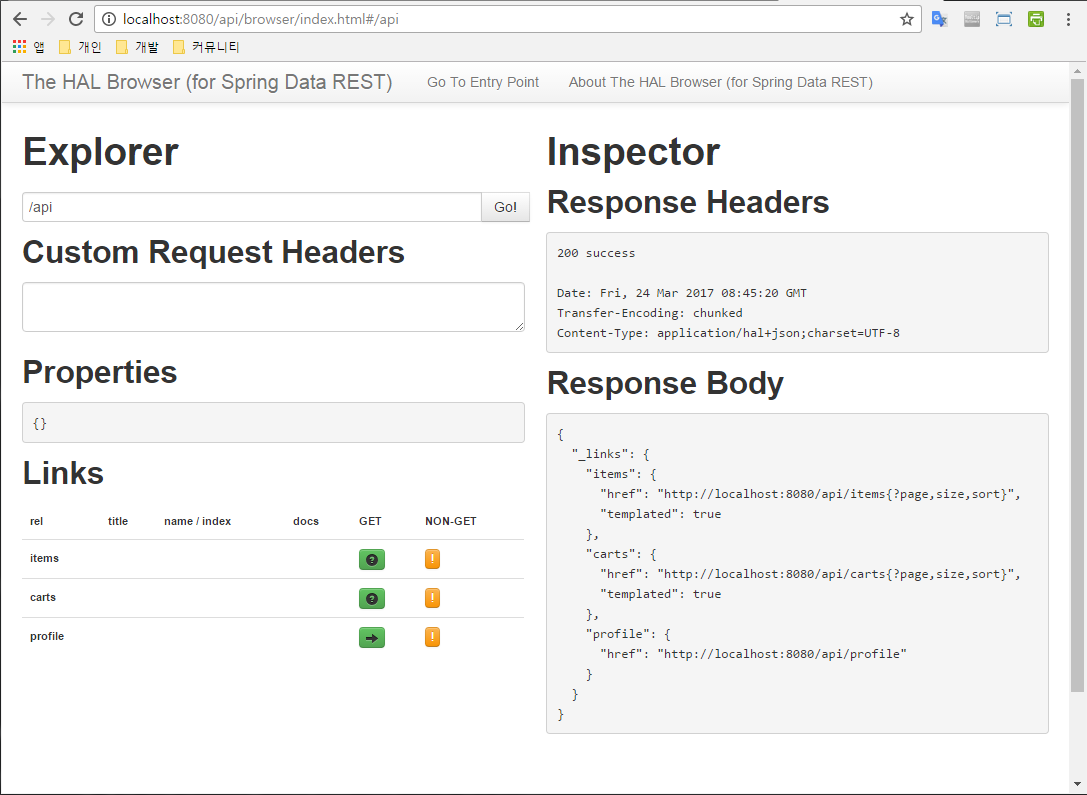
Explorer에서 직접 주소를 쳐서 호출할 수도 있고 아래 Links를 통해 호출 할 수도 있습니다. Links항목중 Carts의 get버튼을 클릭해보면 현재 Cart목록이 나옵니다.
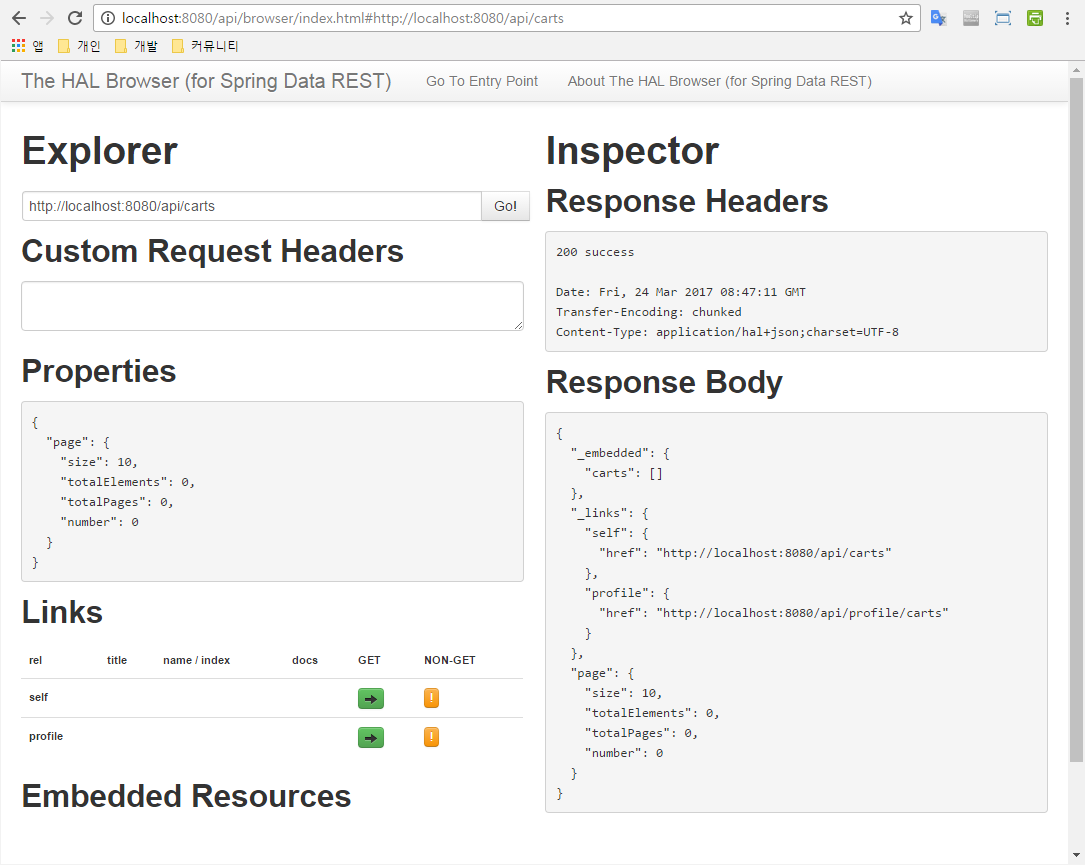
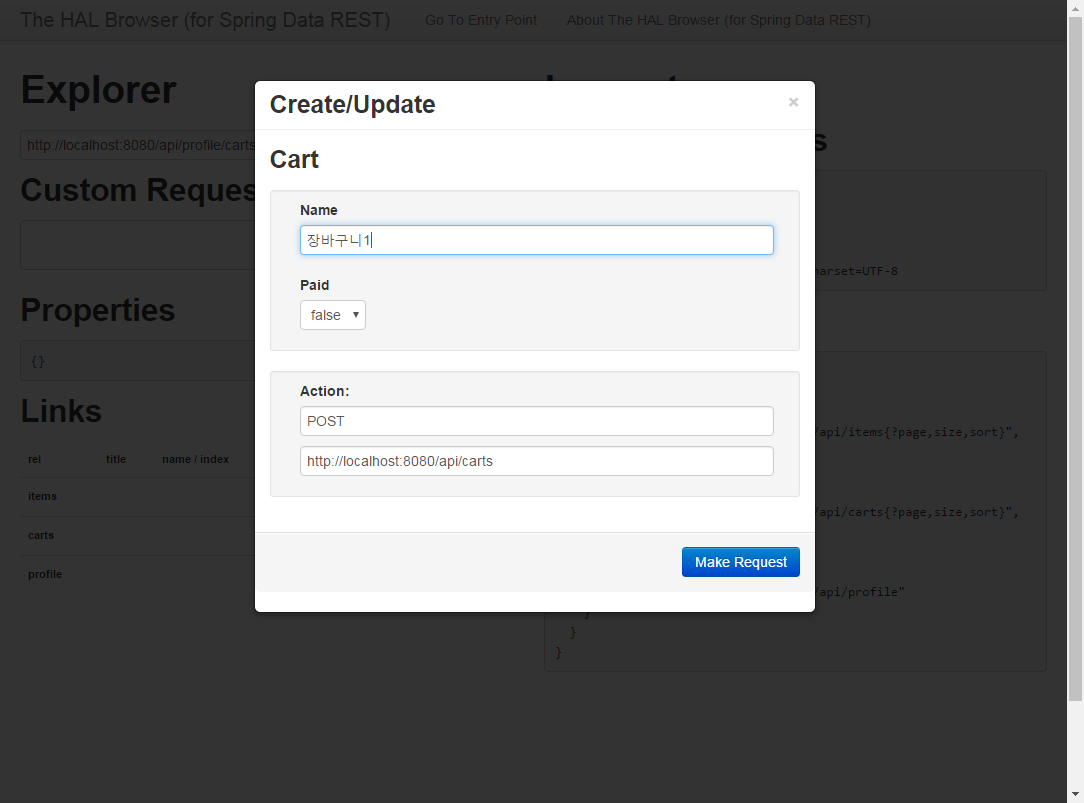
현재는 값이 비어 있는데 Cart값을 하나 넣어보겠습니다. Carts의 non-get버튼을 부르면 Create/Update할 수 있는 화면이 뜹니다.
다시 Cart목록을 호출해보면 아래와 같이 입력한 Cart가 조회됩니다.

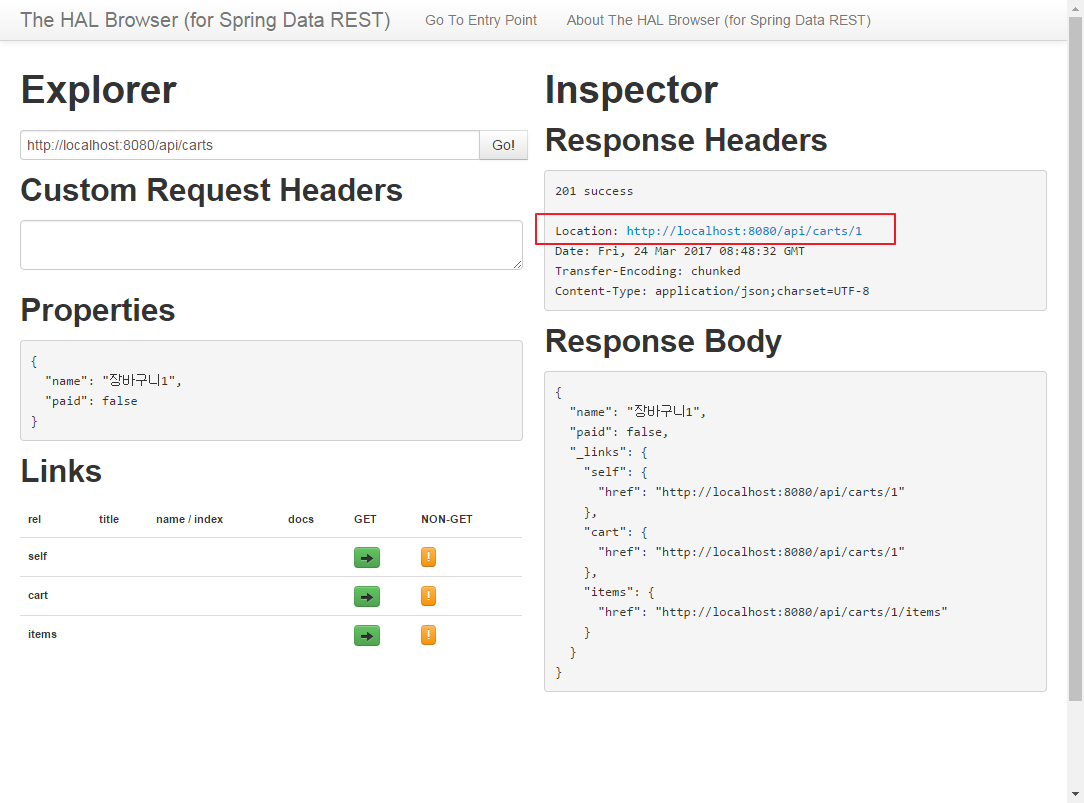
/api/{repository}/{id}형태로 단일 목록도 조회 가능합니다.
아래는 Cart의 1번 목록을 조회한 결과 입니다.
그 외의 CRUD 항목도 자동으로 생성하여 제공합니다.
설정
SpringData REST에서 설정 방식은 3가지가 있습니다. 단, Framework가 SpringBoot 1.2 이상 버전일 경우에만 1번 방식을 사용 가능합니다.
- application.properties(xml,yaml…)에 설정하기
    spring.data.rest.basePath=/api
    spring.data.rest.defaultPageSize=10
- @Configuration 사용하기
    @Configuration
    class CustomRestMvcConfiguration {

      @Bean
      public RepositoryRestConfigurer repositoryRestConfigurer() {

        return new RepositoryRestConfigurerAdapter() {

          @Override
          public void configureRepositoryRestConfiguration(RepositoryRestConfiguration config) {
            config.setBasePath("/api");
          }
        };
      }
    }
- RepositoryRestConfigurerAdapter를 상속받기
    @Component
    public class CustomizedRestMvcConfiguration extends RepositoryRestConfigurerAdapter {

      @Override
      public void configureRepositoryRestConfiguration(RepositoryRestConfiguration config) {
        config.setBasePath("/api");
      }
    }
설정 항목은 아래 표를 참고하세요.
| Name | Description |
|---|---|
| basePath | root URI for Spring Data REST |
| defaultPageSize | change default number of items served in a single page |
| maxPageSize | change maximum number of items in a single page |
| pageParamName | change name of the query parameter for selecting pages |
| limitParamName | change name of the query parameter for number of items to show in a page |
| sortParamName | change name of the query parameter for sorting |
| defaultMediaType | change default media type to use when none is specified |
| returnBodyOnCreate | change if a body should be returned on creating a new entity |
| returnBodyOnUpdate | change if a body should be returned on updating an entity |
Comments